After upgrading to Windows 11, you may experience a high memory usage issue. This can significantly impact your computer’s performance. But what causes Windows 11 to use a lot of RAM? If you’re facing this issue, do you know how to free up RAM on Windows 11?
How to Check Memory Usage on Windows 11?
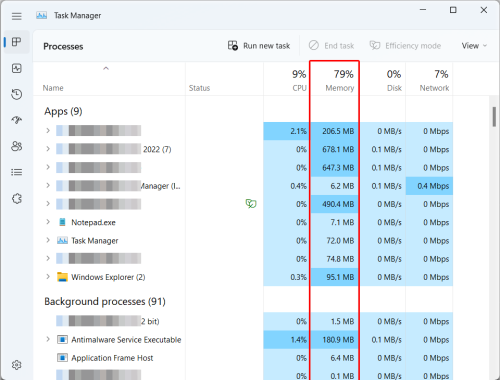
If you want to check the RAM usage of your Windows 11 computer, you can follow these simple steps.
- Press Win+X to call out the WinX menu
- Select Task Manager from the menu
- Click on “More details” to expand the window
- In the “Processes” tab, locate the “Memory” column
- Check the percentage of memory usage for your Windows 11 computer
- Scroll down to view the memory usage for each application or service
- Click on the “Memory” column header to sort the list in ascending or descending order
How to Fix Windows 11 High Memory Usage?
If you’re experiencing high memory usage on your Windows 11 system, there are several ways to free up RAM. One approach is to close unnecessary apps and services, disable unnecessary startup apps, remove any viruses or malware that may consume memory, and try other methods to reduce overall memory usage. The best way to solve the problem is to increase virtual memory, which will not interrupt any Windows functionality. Here are some tips on how to reduce memory usage on Windows 11:
Increase Virtual Memory.
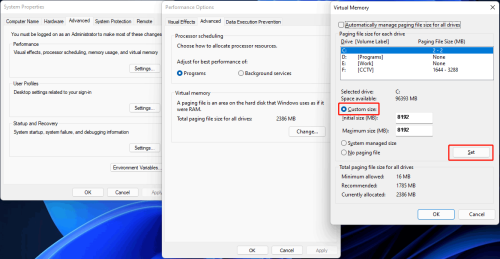
If you’re experiencing high memory usage on your Windows 11 system, increasing virtual memory is one way to solve the problem without interrupting any Windows functionality. Here are the steps to follow:
- Open System Properties by pressing the Windows key and typing “System Properties” in the search bar. Then, click on “System Properties” from the search results.
Note: if you don’t find anythign like system properties then search for “View advanced system settings” - In the System Properties window, click on the “Advanced” tab, and then click on the “Settings” button under the “Performance” section.
- In the Performance Options window, click on the “Advanced” tab, and then click on the “Change” button under the “Virtual Memory” section.
- Ensure the “Automatically manage paging file size for all drives” option is unchecked.
- Select “Custom size” and specify the initial and maximum size for the paging file in megabytes according to your requirements.
- Click the “Set” button, then click “OK”.
- Restart your computer.
Close unnecessary apps and services.
To reduce Windows 11 memory usage, you can close unnecessary apps and services using too much RAM. Here is how you can do it:
- Open Task Manager by right-clicking Start or pressing Win+X and selecting it
- Click on More details if necessary
- Identify the unnecessary apps or services that are using too much memory
- Right-click on one of them and select End task, or select the app or service and click the End task button at the bottom-right corner to close it
- Repeat the above step until you have closed all unnecessary apps and services
By following this method, you can significantly reduce memory usage on your Windows 11 device.

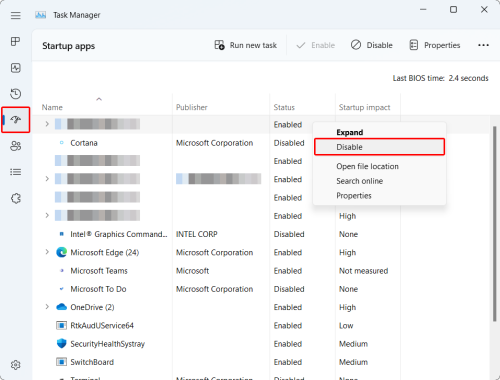
Disable the Unnecessary Startup Apps
Excessive memory usage is a common issue for Windows 11 users. One factor contributing to this problem is the presence of unnecessary startup apps. Disabling them can help reduce memory usage on your Windows 11 computer. Here are the steps:
- Open Task Manager by right-clicking Start and selecting it.
- Click on More details to see advanced options.
- Select the Startup tab to see which apps are set to launch at startup.
- For each unnecessary app, click on it and select Disable.
Following these steps, you can disable the startup feature for all the unnecessary apps and reduce memory usage.
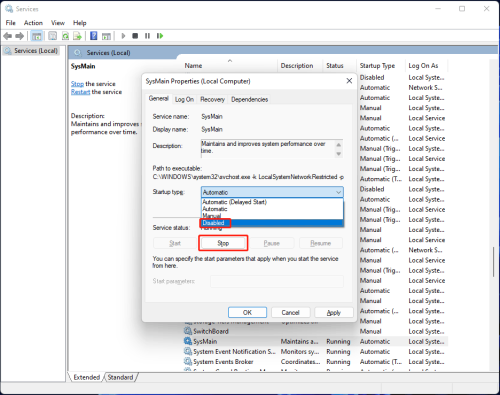
Disable SysMain Service
If your Windows 11 is experiencing reduced performance due to high memory usage, you can disable the SysMain Service to address the issue. SysMain, formerly known as SuperFetch on Windows 10, is responsible for identifying frequently used applications and launching them quickly. Here are the steps to disable the SysMain service:
- To open the Run dialog box, press Win+R.
- Enter “services.msc” into the Run box, and press Enter to open Services.
- Scroll through the list of services in the right panel until you locate SysMain. Double-click on it to open its Properties dialog box.
- Set Startup type to Disabled.
- Click the Stop button and wait for the process to complete.
- Click Apply.
- Click OK.
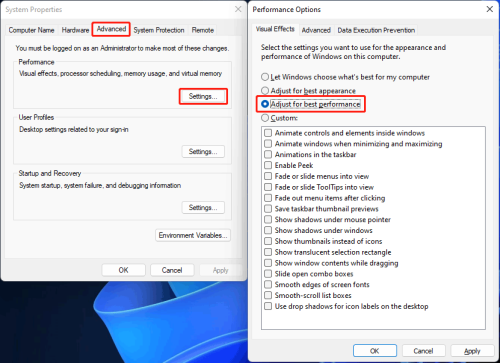
Adjust for Best Performance
You can adjust your visual settings to optimize RAM usage for best performance. This method can help reduce memory usage and improve system performance.
Here are the steps to adjust your visual settings:
- From the taskbar, click the search icon and search for sysdm.cpl.
- Select the sysdm.cpl option from the search results to open System Properties.
- Switch to the Advanced tab.
- Click the Settings button under Performance.
- Under Visual Effects, select “Adjust for best performance.”
- Click Apply to save the changes.
- Click OK to close the window.
Following these steps, you can adjust your visual settings to optimize your computer’s performance and reduce memory usage.
Defragment Your Hard Drive
To reduce memory usage, defragmenting your hard drive is an option worth considering. Here’s how to do it:
- Click on the search icon located on your taskbar and search for “Defragment and Optimize Drives.”
- Select “Defragment and Optimize Drives” from the search results to open it.
- Choose the drive you want to defragment and click the “Optimize” button to start the defragmentation process.
- Once the defragmentation process is completed, restart your computer and check if more memory has been released.

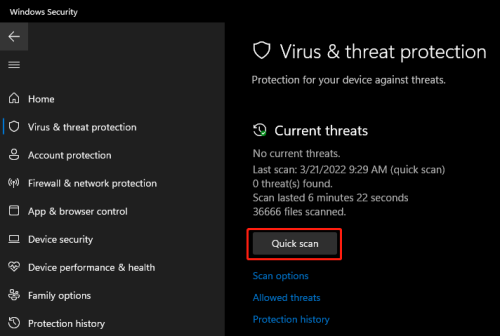
Scan & Remove Viruses and Malware from Your Computer.
To avoid the risk of high memory usage caused by virus and malware attacks, it is crucial to scan and remove them from your device. You can use the in-built Windows Security tool to scan your computer for any potential threats.
Here are the steps you can follow:
- Open the Windows Security tool by searching for it using the Windows search bar.
- Click on the “Virus & threat protection” option.
- Click the “Quick scan” button to scan your device for viruses and malware.
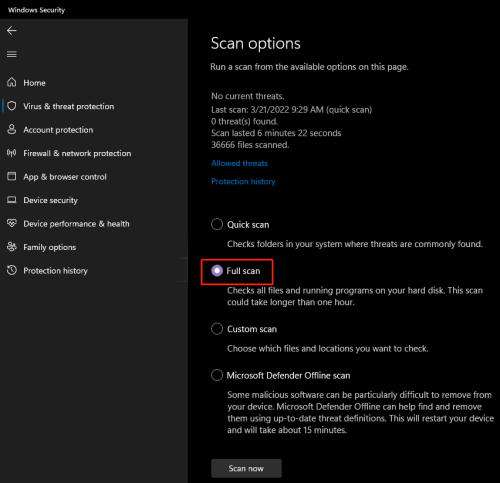
- If the scan doesn’t detect any threats, you can select the “Full scan” option under “Scan options” and click “Scan now” to perform a complete scan of your device.
Besides, you can also consider using third-party anti-virus software like Norton, McAfee, and Bitdefender to ensure the complete removal of viruses and malware.