The Linux kernel is the core of all Linux distributions and is open-source, allowing anyone to review, analyze, and modify the code. Updated kernel versions can enhance security, add new features, and improve overall system performance. In this guide, you will learn how to upgrade the Linux kernel on CentOS 7.
Step 1: Check Your Current Kernel Version
Before upgrading the Linux kernel, you should check the current kernel version running on your system. You can check this by running the following command:
uname -msr
You will see something like this in your terminal.
Step 2: Update CentOS Repositories
Next, update your CentOS repositories to ensure you have the latest software packages. Use the following command to update your repositories:
sudo yum -y update
The -y flag will automatically set “yes” to any prompts that may appear.
Step 3: Enable the ELRepo Repository
The ELRepo repository provides additional kernel packages for CentOS. To enable it, enter the following commands in your terminal.
sudo rpm --import https://www.elrepo.org/RPM-GPG-KEY-elrepo.org
This command installs the GPG key for the ELRepo repository, which is necessary as CentOS does not permit the installation of unsigned software. This key provides a digital signature that ensures the authenticity of the software.
To install the ELRepo repository, enter the following command:
sudo rpm -Uvh https://www.elrepo.org/elrepo-release-7.0-3.el7.elrepo.noarch.rpm
You should see something like this in your terminal.
Step 4: List Available Kernels
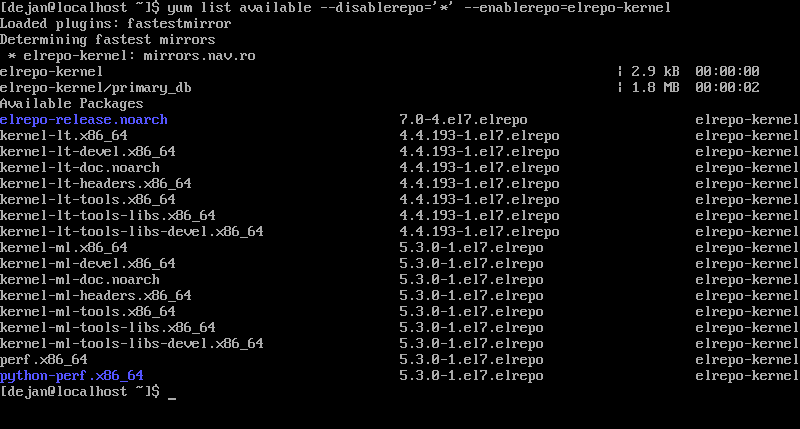
Once the ELRepo repository is enabled, you can list the available kernels by entering the following command in your terminal.
yum list available --disablerepo='*' --enablerepo=elrepo-kernel
You should see a list of available modules after running this command. Look for the line “kernel-lt,” which signifies a stable long-term support release, or “kernel-ml,” which indicates a mainline release with a shorter support term but more frequent updates.
Step 5: Install New CentOS Kernel Version
To install a new mainline kernel, enter the following command in your terminal.
sudo yum --enablerepo=elrepo-kernel install kernel-ml
Or enter the following command to install long-term support kernel
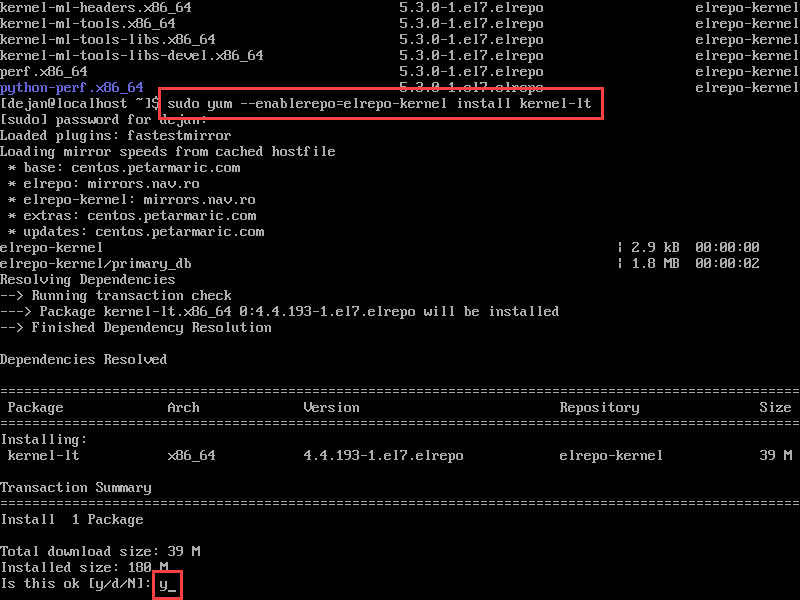
sudo yum --enablerepo=elrepo-kernel install kernel-lt
Once the system initiates the download process, it will prompt for confirmation to proceed with the installation. To approve the installation, type “y” and hit the “Enter” key. Wait for the process to complete.
Step 6: Reboot and Select the New Kernel
Reboot your system by running the command:
reboot
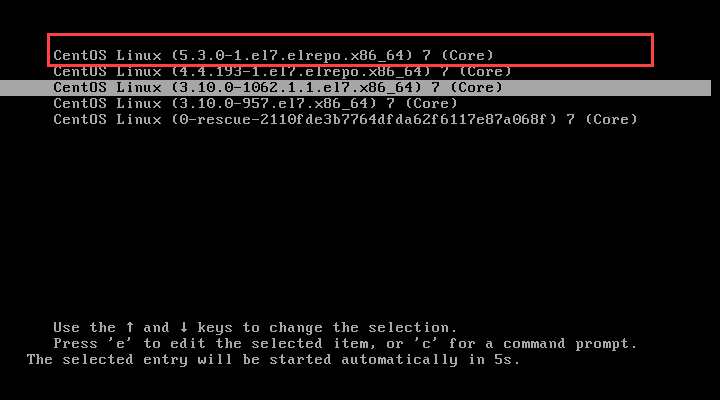
Once the system reboots, you will see the GRUB or boot menu. Use the arrow keys to highlight the newly installed Linux kernel, and then press Enter to select it. Your operating system should then boot up without any issues.
Step 7: Set Default Kernel Version in GRUB
You need to modify the GRUB configuration file to set the newly-installed kernel version as the default boot option. To do this, open the file /etc/default/grub in a text editor and change the value of GRUB_DEFAULT to 0. This will ensure that the first kernel version listed in the GRUB boot menu is the default option.
sudo vim /etc/default/grub
To regenerate the kernel configuration, enter the following command in the terminal.
sudo grub2-mkconfig -o /boot/grub2/grub.cfg
After completing the modifications in the GRUB configuration, reboot the system to ensure that the latest kernel is now being used as the default option.


