You recorded an interview that sounds great in your headphones but is barely audible when someone else plays it on their phone. Or your screen-capture audio is so quiet that turning up the speakers makes the system click louder than the voice. The fix is dynamic range compression — and you don’t need Audacity for it. Here’s how to boost audio in a quiet video in your browser, with one slider.
TL;DR
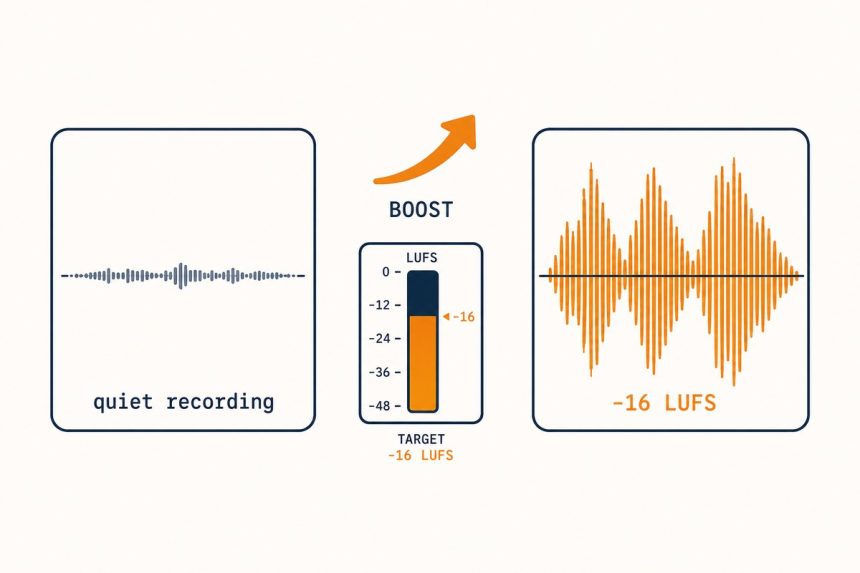
Open how7o’s audio booster, drop your file (audio or video), pick a target loudness (-16 LUFS is a good default), download. The tool uses FFmpeg’s loudnorm filter — the same algorithm Spotify and YouTube use to normalise their catalogues. Browser-only, no upload.
Why phone recordings end up quiet
Phone microphones use automatic gain control (AGC) tuned for the worst case — a sudden loud noise like a slamming door. To avoid clipping if that happens, AGC keeps everything 10–15dB below maximum. The result: a recording with all the dynamic range intact but the average level too low to hear comfortably.
Dynamic range compression raises the quiet majority of the audio toward a target loudness while limiting the loud peaks, which is exactly what every podcast, broadcast, and streaming service does. The difference between a “quiet” recording and a “loud” one is usually 10–15dB of compression, not better mics.
Step-by-step
- Open /audio-booster.
- Drop your audio or video file onto the page.
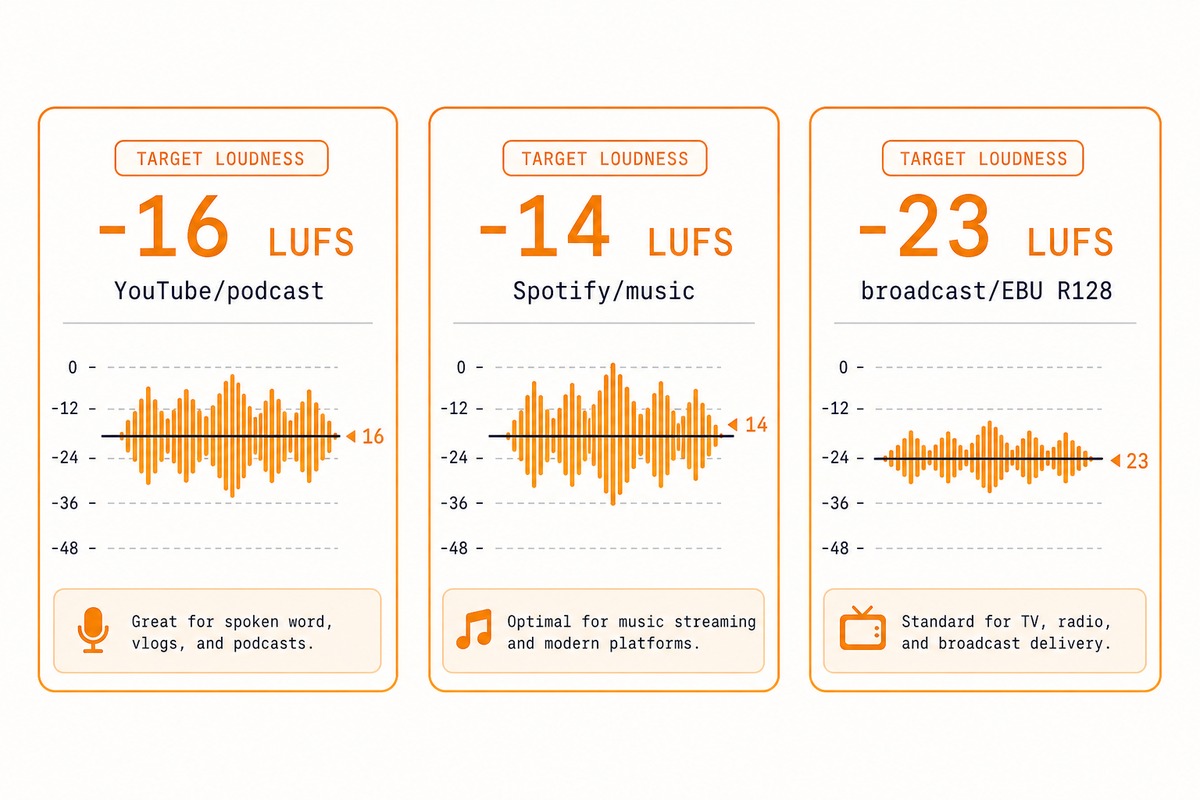
- Pick a target loudness: -16 LUFS (default — matches YouTube), -14 LUFS (Spotify), or -23 LUFS (broadcast EBU R128).
- Click Boost. The tool does a two-pass loudnorm analysis — measure first, then correct — which takes about 30 seconds per minute of audio on modern hardware.
- Download. The output keeps your original format and adds
-boostedto the filename.
LUFS vs dB — what the numbers actually mean
Old audio software measured volume in dBFS (decibels relative to full-scale digital). It told you peak amplitude — useful for avoiding clipping, useless for telling you how loud something sounds. A signal can peak at -3dBFS and still sound quiet because the average level is low.
LUFS (Loudness Units Full Scale) measures perceived loudness with a weighting curve that matches human hearing. A recording at -16 LUFS sounds about the same volume as any other -16 LUFS recording, regardless of whether the peaks are at -3 or -8dBFS. That’s why every streaming service switched to LUFS for normalisation.
Troubleshooting
“The boosted file now hisses or hums”
Boost raises everything, including noise floor. If the original had a tiny hiss you didn’t notice, the boosted version has an obvious one. For noisy sources: use Audacity’s noise reduction (free) on the source first, then boost. Browser-based denoise is on our roadmap.
“Sudden loud sounds in the file got crushed”
The loudnorm filter applies a limiter on peaks. For very dynamic content (live music with sudden crashes), the limiter can audibly squash transients. Pick a lower target (-20 LUFS instead of -16) — less compression, less peak squashing, audio still meaningfully louder than the original.
“My video is still quiet after boosting”
Check the playback device. Phone speakers, laptop speakers, and TV speakers have wildly different output levels — a file that’s loud on headphones can still sound quiet on a TV. The file is correct; the playback hardware is the bottleneck. For TV playback aim for -14 LUFS instead of -16.
Measure first — how to know if your audio actually needs boosting
Boosting healthy audio makes it worse, not better. The limiter clamps peaks, the dynamic feel flattens, and you’ve added an unnecessary encoding pass. Measure before you boost.
The tool runs a one-pass loudness analysis as soon as you load a file and reports integrated loudness in LUFS:
- -14 to -18 LUFS — already in the streaming target range. Skip the boost; you’re done.
- -19 to -23 LUFS — slightly quiet but acceptable. Boost only if the destination demands it; Spotify and YouTube will gain-match anyway.
- -24 LUFS or quieter — measurably quiet. Boost is worth running.
If your file is already loud and clipping (peaks at 0dBFS, integrated above -10 LUFS), boosting makes it worse. That’s a sign the original recording was over-driven — you need to re-record or run a de-clipper, not push it higher.
It would if the tool used flat gain. Our booster uses dynamic range compression — it raises the quiet parts toward a target loudness while pulling down anything that would clip. Result: a flat, listenable level without that crushed ‘loudness war’ sound.
Phone microphones are tiny and the auto-gain is conservative to avoid clipping in loud environments. A normal indoor conversation typically records at -25 to -30 LUFS — about 10dB below comfortable listening level. Boosting brings it to -16 LUFS, which matches what podcasts and YouTube target.
Yes — that’s the trade-off. Anything quiet in the original gets louder. For noisy recordings, use a noise-reduction pass first (Audacity is free), then boost. Boosting alone amplifies noise along with signal.
All three. The tool reads any audio FFmpeg understands and any video container with an audio track. Output matches your input format by default.
Related guides
- Audio booster — the tool above.
- Video to MP3 — strip audio out before processing if the video container is unusual.
- Video trimmer — cut the boring parts first, then boost what’s left.
- Video speed changer — for the other half of post-processing.
- Merge videos online (no watermark) — when boosting one quiet clip among many.
- Convert MP4 to MP3 free in your browser — to extract the boosted audio as a standalone MP3.
The EBU R128 loudness standard that defines LUFS measurement is documented at the European Broadcasting Union.