Tailscale is a zero-config mesh VPN built on top of WireGuard. Every device joins a private “tailnet” and gets a stable IP that works no matter where on the internet it is — home Wi-Fi, hotel, mobile data, behind double NAT, doesn’t matter. Connections are direct (peer-to-peer through firewalls) and end-to-end encrypted. For self-hosters running services on a home server, this replaces port forwarding entirely. Below: installing Tailscale on Ubuntu, joining it to your tailnet, and configuring subnet routes and exit nodes.
- TL;DR
- Why Tailscale (when WireGuard already exists)
- Step 1 — Install Tailscale
- Step 2 — Join the tailnet
- Step 3 — Enable MagicDNS
- Step 4 — Advertise subnet routes (optional)
- Step 5 — Use as an exit node (optional)
- Troubleshooting
- “Connection works but slow”
- “Device shows as connected but can’t reach services”
- “Server keeps re-authing every 90 days”
- Related guides
TL;DR
curl -fsSL https://tailscale.com/install.sh | sh, sudo tailscale up, open the browser URL it prints, log in, and the machine is on your tailnet. From any other Tailscale-running device, SSH/HTTP/whatever directly to the new machine using its tailnet IP or MagicDNS hostname. No port forwards, no static IPs, no VPN config files.
Why Tailscale (when WireGuard already exists)
WireGuard is the protocol; Tailscale is the orchestration layer around it. Tailscale handles:
- Key exchange and rotation — you never manually copy keys between devices.
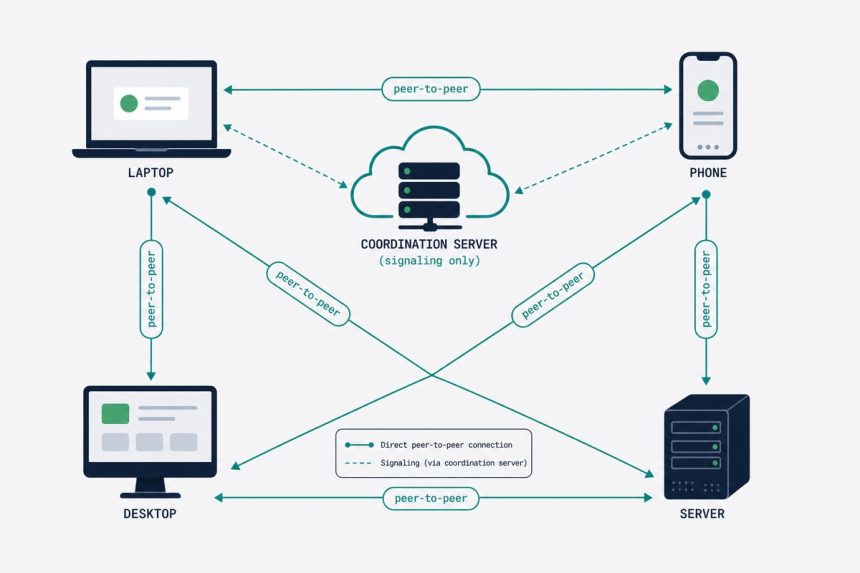
- NAT traversal — Tailscale’s coordination server (DERP) helps devices establish direct connections through NAT and firewalls. Falls back to relayed mode if direct isn’t possible.
- Authentication — devices authenticate via your identity provider (Google, Microsoft, GitHub, email).
- MagicDNS — short names (e.g.
my-server) instead of IPs across the tailnet. - ACLs — declarative access rules: only the laptop user can SSH into the server, only the family can reach the Plex box, etc.
For raw VPN tunneling between two servers you fully control, plain WireGuard is great. For “every device I own should reach every other device I own”, Tailscale is the right level of abstraction.
Step 1 — Install Tailscale
curl -fsSL https://tailscale.com/install.sh | shThe script detects Ubuntu version, adds Tailscale’s apt repo, installs the daemon, and enables it. On a fresh 24.04 it’s about 15 seconds.
For a more auditable install (production servers), use the apt repo directly:
curl -fsSL https://pkgs.tailscale.com/stable/ubuntu/$(lsb_release -cs).noarmor.gpg | sudo tee /usr/share/keyrings/tailscale-archive-keyring.gpg > /dev/null
curl -fsSL https://pkgs.tailscale.com/stable/ubuntu/$(lsb_release -cs).tailscale-keyring.list | sudo tee /etc/apt/sources.list.d/tailscale.list
sudo apt update
sudo apt install tailscale
Step 2 — Join the tailnet
sudo tailscale upThe command prints a URL. Open it in any browser, log in with your identity provider (you create a free Tailscale account on first use), and authorise the device. The terminal returns once authorised.
For headless servers without a graphical browser available, the same flow works — just open the URL on your laptop. The auth is tied to the URL, not the device’s browser.
Confirm the device is on the tailnet:
tailscale ip -4
tailscale status
The IP is in the 100.x.x.x range — that’s the Tailscale CGNAT space. Every device on your tailnet now reaches this server on that IP, from anywhere.
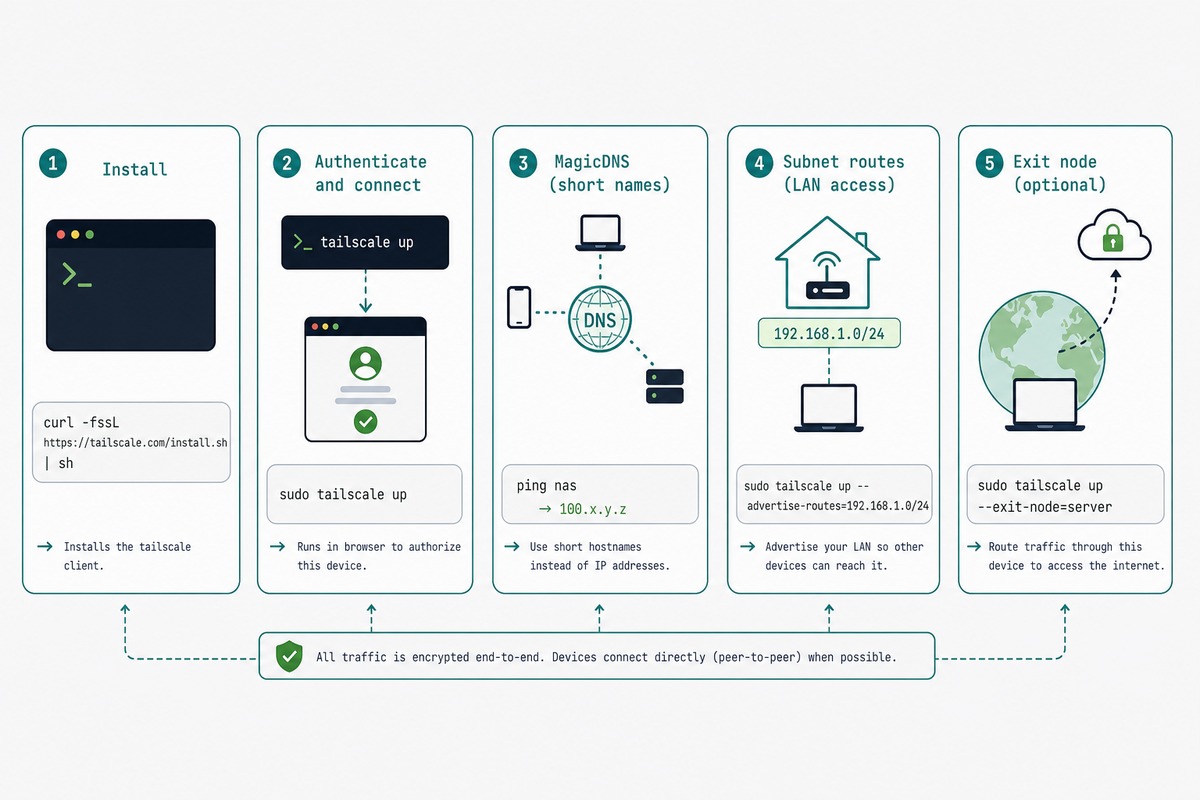
Step 3 — Enable MagicDNS
MagicDNS turns 100.64.0.5 into my-ubuntu-server.tail-scale.ts.net (or whatever your tailnet name is) and into the short form my-ubuntu-server.
Enable in the Tailscale admin panel: DNS → MagicDNS → Enable. From then on, every device on the tailnet can reach this server by hostname: ssh my-ubuntu-server, curl http://my-ubuntu-server:3000, etc.
Step 4 — Advertise subnet routes (optional)
If the Tailscale-running server is on a LAN (say, 192.168.1.0/24) and you want other tailnet devices to reach other devices on that LAN (a printer, a router admin page, a non-Tailscale Raspberry Pi), make it a subnet router:
echo "net.ipv4.ip_forward = 1" | sudo tee -a /etc/sysctl.d/99-tailscale.conf
sudo sysctl -p /etc/sysctl.d/99-tailscale.conf
sudo tailscale up --advertise-routes=192.168.1.0/24
Then in the Tailscale admin panel: Machines → this server → Edit route settings → enable the 192.168.1.0/24 route. From then on, every tailnet device can reach 192.168.1.x as if it were on the same LAN.
Step 5 — Use as an exit node (optional)
An exit node sends all internet traffic from the connecting device through the server — like a personal VPN. Useful for accessing your home network’s outbound IP from a public Wi-Fi, or just for browsing from “home” while travelling.
sudo tailscale up --advertise-exit-nodeEnable in admin: Machines → this server → Edit route settings → “Use as exit node”. From any other tailnet device’s Tailscale UI, pick this server as the exit node — all traffic now egresses through it.
Troubleshooting
“Connection works but slow”
Likely going through DERP (relay) instead of direct peer-to-peer. Run tailscale netcheck to diagnose NAT and connectivity. If the report shows hard NAT or symmetric NAT, direct connections aren’t possible — you’ll be on DERP relays, which add 10-30 ms of latency.
“Device shows as connected but can’t reach services”
The service is bound to 127.0.0.1 instead of 0.0.0.0 or the Tailscale interface. Bind to 0.0.0.0 or specifically 100.x.x.x, or use Tailscale Serve to expose the local-only service to the tailnet: tailscale serve 8080.
“Server keeps re-authing every 90 days”
The default key expiry. For servers that should stay connected indefinitely, set the device as a “key-expiry-disabled” device in the admin panel (Machines → … → Disable key expiry). Then tailscale up once with --reset to apply.
Yes for personal use — 100 devices, 3 users, all features included. Pricing kicks in for teams beyond 3 users or for enterprise features (SCIM provisioning, advanced ACLs, audit logs). For self-hosters, the free tier is functionally unlimited.
The client is open source (BSD-3); the coordination server is proprietary. For a fully open-source alternative, Headscale is a community-built open-source implementation of the Tailscale control plane — you self-host it and point Tailscale clients at it. Same client experience, no third-party server.
No. Traffic between tailnet devices is end-to-end encrypted with WireGuard keys negotiated client-to-client. Tailscale’s coordination server brokers introductions and stores public keys, but never sees plaintext traffic. The DERP relays, when used, see encrypted blobs and route them but cannot decrypt.
Both are mesh VPN orchestration over WireGuard-style protocols. Tailscale has a slicker UI, better identity integration, and broader platform support; ZeroTier has more flexibility on network topology and a longer history. For most self-hosting use cases Tailscale is friendlier; ZeroTier wins for unusual networking requirements.
Yes — and many self-hosters do exactly this. Tailscale on a $5 VPS, exit-node enabled, and you have a personal VPN with the VPS’s static IP that you can route through from any of your other devices. Cleaner than running OpenVPN or commercial VPNs.
Existing direct peer-to-peer connections continue to work — they don’t need the coordination server to keep flowing. New connections and key rotations stop. The mitigation is Headscale (self-hosted control plane) if you can’t tolerate that dependency.
Related guides
- Set up WireGuard VPN on Ubuntu — the protocol Tailscale uses under the hood.
- Install Cloudflare Tunnel — the public-internet alternative when you want services reachable from anywhere, not just your tailnet.
- SSH key authentication on Ubuntu — still the right SSH setup even with Tailscale handling the network layer.
- Harden an Ubuntu VPS — Tailscale doesn’t replace server hardening, just reduces what you need to expose publicly.
Tailscale’s documentation covers MagicDNS, subnet routers, ACL syntax, and more at tailscale.com/kb.