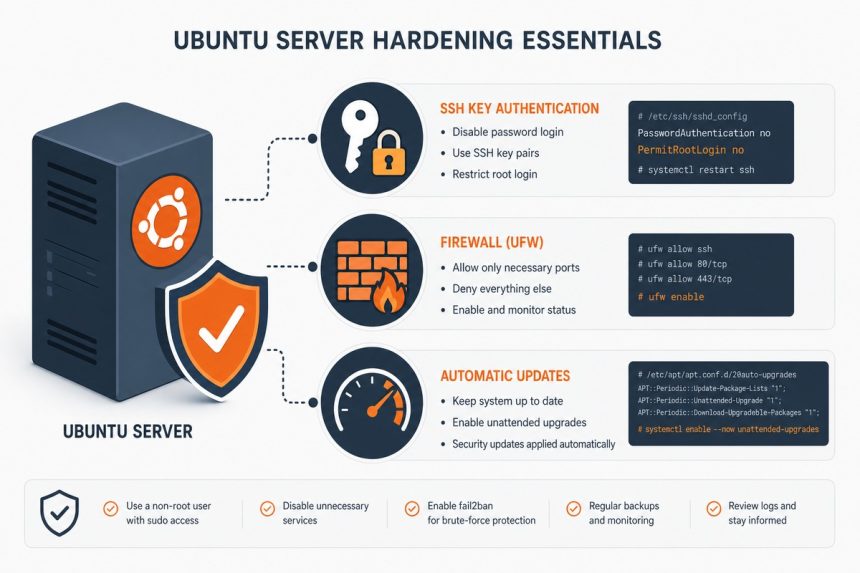
A fresh Ubuntu VPS from any major provider ships with a default-allow firewall, password-auth SSH, and no automatic security updates. Bots find it within minutes and start brute-forcing port 22. The first ten minutes after spin-up are when you fix that — create a non-root user with SSH key auth, lock down sshd, enable UFW, install Fail2Ban, and turn on unattended security updates. This guide walks the full checklist.
- The threat model
- Step 1 — connect as root and update
- Step 2 — create a non-root sudo user
- Step 3 — set up SSH key authentication
- Step 4 — disable password and root SSH login
- Step 5 — optional: move SSH off port 22
- Step 6 — turn on UFW
- Step 7 — install Fail2Ban
- Step 8 — automatic security updates
- Step 9 — disable unused services
- Step 10 — final verification
- Weekly checklist
- Frequently asked questions
- Related guides
- References
Last verified: 2026-05-17 on Ubuntu 24.04 LTS.
The threat model
Within minutes of a new public IP coming online, internet-scanning bots probe it for SSH, FTP, MySQL, Redis, and a few dozen other ports. Their goal is one of: (1) brute-force a weak password and install a cryptominer or botnet client, (2) exploit a known-unpatched service, or (3) chain into a credential-harvesting tool that targets your domain’s other systems. The fixes below address all three.
Step 1 — connect as root and update
ssh root@your-server-ip

# Update package lists and install pending security patches
apt update
apt upgrade -y
apt autoremove -y
Do this before anything else. A freshly imaged VPS can be months out of date if the provider’s image is stale.
Step 2 — create a non-root sudo user
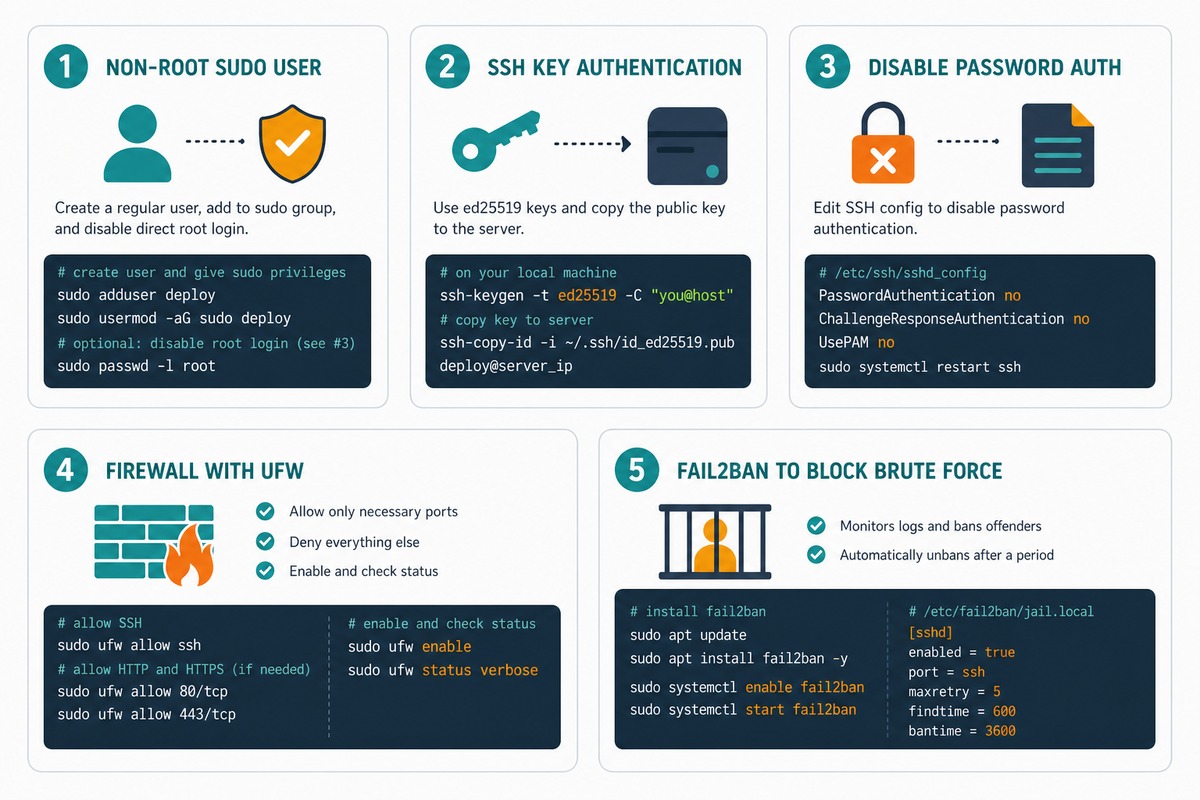
adduser alice                  # prompts for password and basic info
usermod -aG sudo alice         # grant sudo

# Verify
sudo -u alice sudo -l          # should list "(ALL : ALL) ALL"
From this point on, never SSH in as root again. Every administrative action is ssh alice@server + sudo. This gives you an audit trail in /var/log/auth.log and prevents the catastrophic damage one stray command as root can do.
Step 3 — set up SSH key authentication
On your laptop (not the server), generate a modern key pair:
# From your laptop
ssh-keygen -t ed25519 -C "alice@laptop"

# Default location is ~/.ssh/id_ed25519 — accept it
# Set a passphrase (recommended) so a stolen laptop can't be used immediately
Then copy the public key to the server. ssh-copy-id handles the directory creation and permissions on the remote side:
# From your laptop
ssh-copy-id alice@your-server-ip

# Test — should log in without prompting for a password
ssh alice@your-server-ip
If ssh-copy-id isn’t installed, the manual equivalent is to append ~/.ssh/id_ed25519.pub to ~alice/.ssh/authorized_keys on the server, with the file mode 0600 and the directory mode 0700.
Step 4 — disable password and root SSH login
Modern Ubuntu reads SSH config from snippets under /etc/ssh/sshd_config.d/ — drop a single file there rather than editing the main config:
sudo tee /etc/ssh/sshd_config.d/hardening.conf >/dev/null << 'EOF'
PasswordAuthentication no
PermitRootLogin no
PubkeyAuthentication yes
KbdInteractiveAuthentication no
EOF

# Validate the config before reloading
sudo sshd -t

# Reload (does NOT drop your current session)
sudo systemctl reload ssh
The sshd -t step is critical — a typo would prevent sshd from starting, and on a remote box that means lockout. sshd -t parses the config and prints errors without applying changes. Only reload if it’s silent.
Keep your existing SSH session open and test the new config from a second terminal before logging out — if you locked yourself out, you can fix it from the still-open session.
Step 5 — optional: move SSH off port 22
sudo tee -a /etc/ssh/sshd_config.d/hardening.conf >/dev/null << 'EOF'
Port 2222
EOF

sudo sshd -t
sudo systemctl reload ssh

# Open the new port BEFORE closing 22 — see Step 6
sudo ufw allow 2222/tcp
sudo ufw delete allow 22/tcp     # only after testing the new port works
Moving SSH off port 22 drops the vast majority of automated brute-force traffic — bot armies scan 22, rarely 2222. Combined with key-only auth and Fail2Ban this is “defence in depth,” not the security itself. For more on the change, see How to Change the Default SSH Port on Linux.
Step 6 — turn on UFW
# Default policy: deny incoming, allow outgoing
sudo ufw default deny incoming
sudo ufw default allow outgoing

# Allow SSH FIRST (or you'll lock yourself out)
sudo ufw allow OpenSSH         # uses port 22; change if you moved SSH

# Web traffic (skip if this server isn't a web server)
sudo ufw allow 80/tcp
sudo ufw allow 443/tcp

# Activate
sudo ufw enable                # confirms before applying

# Confirm
sudo ufw status verbose
UFW writes iptables rules under the hood. ufw enable persists across reboots — there’s no separate “save” step. After enabling, only the ports you explicitly allowed accept inbound connections.
Audit your listening ports periodically: sudo ss -tlnp shows every listening process, the port it bound to, and which user owns it. Anything unexpected is worth investigating.
Step 7 — install Fail2Ban
sudo apt install -y fail2ban

# Local override file — never edit jail.conf directly (it gets overwritten on package updates)
sudo tee /etc/fail2ban/jail.local >/dev/null << 'EOF'
[DEFAULT]
bantime  = 1h
findtime = 10m
maxretry = 3
# Add your office IP / VPN range to never get banned by mistake
ignoreip = 127.0.0.1/8 ::1

[sshd]
enabled = true
EOF

sudo systemctl enable --now fail2ban

# Verify the SSH jail is running
sudo fail2ban-client status sshd
Three failed login attempts in any 10-minute window trigger a 1-hour IP ban. The ban is enforced by Fail2Ban writing nftables rules — the attacker can’t even establish a TCP connection during the ban window.
Even with key-only auth (no password to brute-force), Fail2Ban is valuable: it bans IPs that probe for known usernames or trigger SSH version-string mismatches, which is the kind of traffic a script-kiddy sweep generates.
Step 8 — automatic security updates
sudo apt install -y unattended-upgrades

# Enable automatic security upgrades (already enabled on most Ubuntu installs)
sudo dpkg-reconfigure --priority=low unattended-upgrades

# Confirm what's enabled
cat /etc/apt/apt.conf.d/50unattended-upgrades | grep -E '^[^/]'
cat /etc/apt/apt.conf.d/20auto-upgrades
By default, unattended-upgrades only installs security updates — feature updates still wait for manual intervention. The package also handles unattended kernel updates and (configurable) automatic reboots when needed.
# Dry-run — see what would be installed without actually installing
sudo unattended-upgrades --dry-run --debug

# Look at recent activity
tail -n 50 /var/log/unattended-upgrades/unattended-upgrades.log
Step 9 — disable unused services
# List every service currently enabled
sudo systemctl list-unit-files --state=enabled --type=service

# Show every TCP/UDP socket that's listening
sudo ss -tulnp
Look for anything you didn’t install on purpose — a stray cups, rpcbind, avahi-daemon, or developer-debug service on a production box should be removed: sudo systemctl disable --now servicename; sudo apt remove servicename. Less listening surface area = less attack surface.
Step 10 — final verification
# SSH from a fresh terminal — confirm key auth works, password auth is refused
ssh alice@server                    # should succeed silently (no password prompt)
ssh root@server                     # should refuse with "Permission denied (publickey)"

# UFW status
sudo ufw status verbose

# Fail2Ban status
sudo fail2ban-client status

# Pending updates
apt list --upgradable

# What's listening publicly
sudo ss -tlnp
If root SSH fails with “Permission denied (publickey)” and alice SSH succeeds silently, you’ve passed the basic test. UFW status should show your allowed ports and “Status: active.” Fail2Ban should report at least the sshd jail active.
Weekly checklist
sudo fail2ban-client status sshd— review currently banned IPs; look for repeat offenders worth permanently blocking at the firewall.apt list --upgradable— confirm unattended-upgrades is keeping up; if there’s a backlog, runsudo apt upgrademanually.sudo last -n 50— review the last 50 logins. Anything you don’t recognise is worth investigating.tail /var/log/auth.log— auth-related events. Many “Failed password” lines from one IP that aren’t being banned means tuning Fail2Ban; many succeeded logins from unexpected places means rotating keys.
Frequently asked questions
Disable it entirely. Leaving password auth on for non-root users means an attacker who guesses any user’s password gets a shell — and from there, privilege escalation paths are well-known. With PasswordAuthentication no, key-only login is enforced for every account, including service accounts. The cost is real: if you lose your key with no backup, you’re locked out. Mitigation is your cloud provider’s web console / serial-console access, which always works even when SSH doesn’t.
Mild but real value. Moving SSH to a non-standard port (e.g. 2222) drops 99% of automated brute-force traffic — bot armies scan port 22 and rarely bother probing higher ports. It’s not security (a targeted attacker just runs nmap), but it cuts log noise so Fail2Ban has less to chew on and your auth.log stays readable. Combined with key-only auth and Fail2Ban, port-change is a small bonus.
bantime be? Defaults are 10 minutes ban after 5 failed attempts in a 10-minute window — too lenient for production. A sensible step-up: bantime = 1h, findtime = 10m, maxretry = 3. For aggressive policy, set bantime = -1 for permanent bans on first offence — risky if you might lock yourself out, so combine with ignoreip whitelisting your office IP. Fail2Ban writes to iptables/nftables directly; once banned, the IP can’t even establish a TCP connection.
UFW is a friendlier front-end that writes iptables rules. ufw allow 22/tcp compiles to several iptables rules in the filter table. The underlying kernel feature (now called nftables on Ubuntu 22.04+) is what actually filters packets. You can mix tools, but pick one as the source of truth — running UFW alongside hand-written iptables rules leads to confusing conflicts. For most servers, UFW alone is enough.
Related guides
- How to Change the Default SSH Port on Linux
- How to Install the Apache Web Server on Ubuntu
- How to Install MySQL on Ubuntu
- How to Run a Cron Job as a Non-Root User
- How to Check Your Ubuntu Version
References
Ubuntu Server security guide: ubuntu.com/server/docs/security-introduction. OpenSSH server config reference: man.openbsd.org/sshd_config. UFW manual: man ufw. Fail2Ban docs: github.com/fail2ban/fail2ban/wiki. Unattended-upgrades: wiki.debian.org/UnattendedUpgrades.