Caddy is a modern web server written in Go, with one defining feature: automatic HTTPS. You write a domain name in the config, Caddy provisions a Let’s Encrypt certificate, renews it forever, redirects HTTP to HTTPS, and stays out of your way. No certbot, no separate renewal cron, no certificate copying. This guide shows how to install Caddy on Ubuntu, write a Caddyfile that handles the three most common patterns (static site, reverse proxy, PHP-FPM), and migrate a typical nginx config across.
- TL;DR
- When Caddy beats nginx (and when it doesn’t)
- Step 1 — Install Caddy from the official apt repo
- Step 2 — Write the Caddyfile
- Migrating from nginx (line-by-line comparison)
- Logs and observability
- Troubleshooting
- “Caddy can’t get a certificate”
- “Caddyfile reload fails after my edit”
- “PHP-FPM site shows ‘File not found’ errors”
- Related guides
TL;DR
Add the Caddy apt repo, sudo apt install caddy, edit /etc/caddy/Caddyfile, write one line per site (example.com { reverse_proxy localhost:3000 }), sudo systemctl reload caddy. HTTPS appears automatically within 30 seconds. Logs at journalctl -u caddy.
When Caddy beats nginx (and when it doesn’t)
- Caddy wins for: small-to-medium sites, hobby self-hosting, dev environments, anywhere you’d rather not write 40 lines of nginx config + certbot dance for a single hostname. Auto-HTTPS is genuinely magic.
- nginx still wins for: very high-traffic sites (Caddy is fast, but nginx’s tuning is better-documented at the bleeding edge), complex routing requirements, environments with hard nginx expertise on the team, and any setup that requires modules nginx has been compiling for fifteen years (e.g.
ngx_brotli,ngx_pagespeed).
Step 1 — Install Caddy from the official apt repo
sudo apt install -y debian-keyring debian-archive-keyring apt-transport-https curl
curl -1sLf 'https://dl.cloudsmith.io/public/caddy/stable/gpg.key' | sudo gpg --dearmor -o /usr/share/keyrings/caddy-stable-archive-keyring.gpg
curl -1sLf 'https://dl.cloudsmith.io/public/caddy/stable/debian.deb.txt' | sudo tee /etc/apt/sources.list.d/caddy-stable.list
sudo apt update
sudo apt install caddy
Caddy starts immediately and serves a placeholder page on port 80. Confirm:
sudo systemctl status caddy
caddy version
Step 2 — Write the Caddyfile
sudo nano /etc/caddy/CaddyfileA Caddyfile for three different patterns:
# Static site
example.com {
    root * /var/www/example.com
    file_server
    encode gzip zstd
}

# Reverse proxy to a Node app
api.example.com {
    reverse_proxy localhost:3000
}

# PHP-FPM site (Laravel, WordPress)
blog.example.com {
    root * /var/www/blog/public
    php_fastcgi unix//run/php/php8.4-fpm.sock
    file_server
}
That’s the entire config — three sites, full HTTPS. Caddy provisions Let’s Encrypt certificates for each hostname, redirects HTTP to HTTPS, terminates TLS, enables gzip + zstd compression, and proxies to the right backend. There is no separate cert config, no rewrite block, no listen 443 ssl directive. Reload:
sudo systemctl reload caddyWithin 30 seconds, all three hostnames are HTTPS. Watch the magic in real time:
journalctl -u caddy -f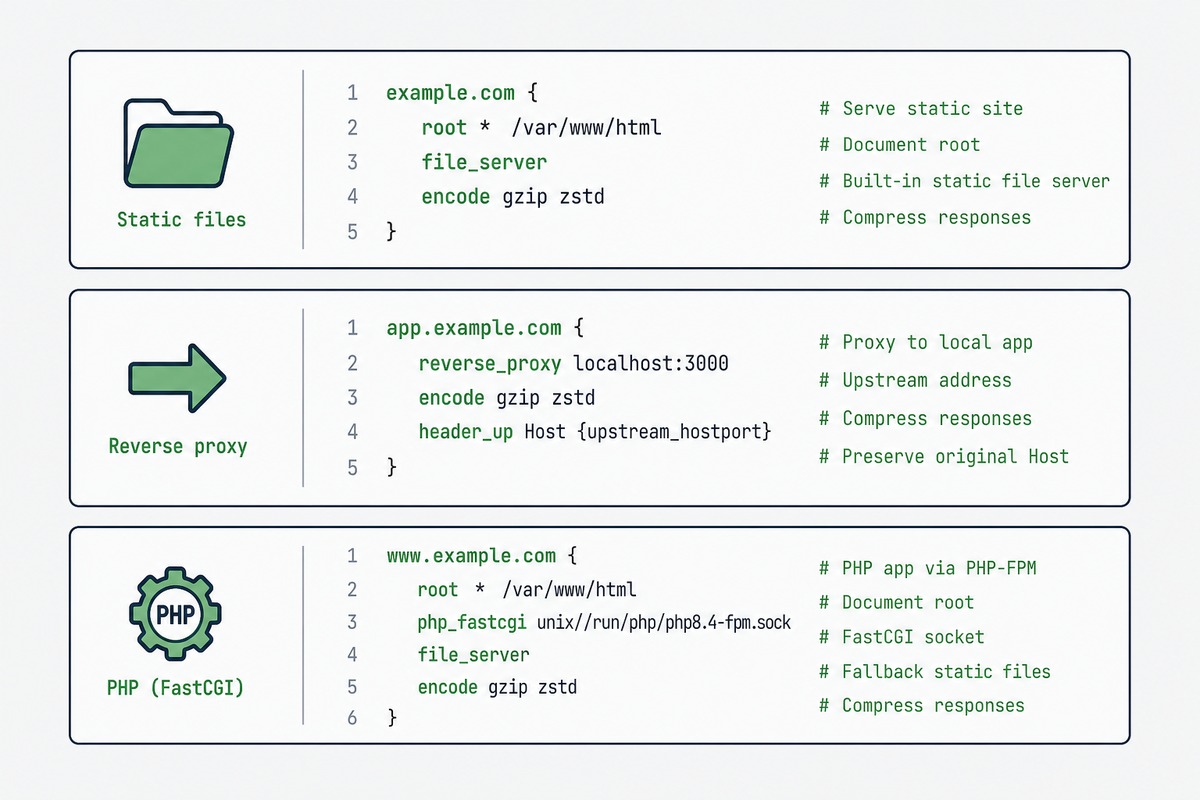
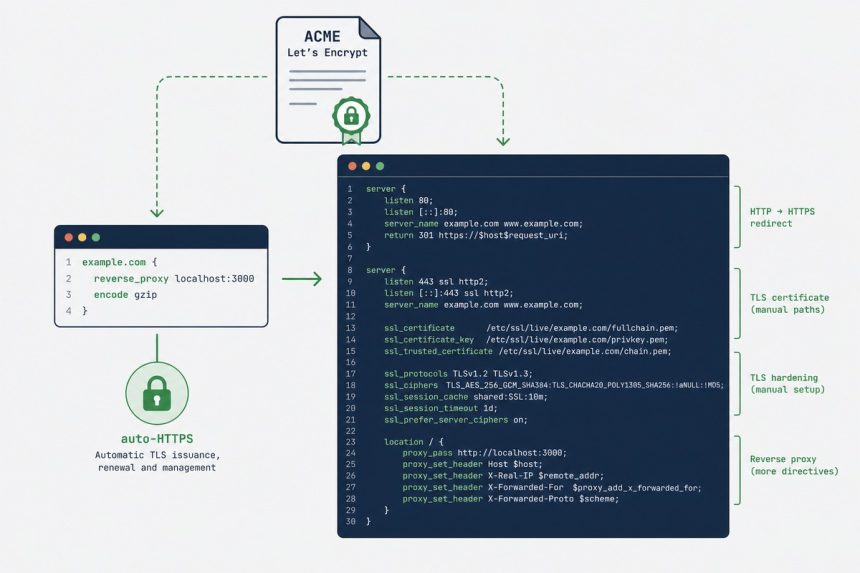
Migrating from nginx (line-by-line comparison)
A typical nginx config for a reverse-proxied app with HTTPS:
# nginx — ~25 lines
server {
    listen 80;
    server_name api.example.com;
    return 301 https://$host$request_uri;
}
server {
    listen 443 ssl http2;
    server_name api.example.com;

    ssl_certificate /etc/letsencrypt/live/api.example.com/fullchain.pem;
    ssl_certificate_key /etc/letsencrypt/live/api.example.com/privkey.pem;
    ssl_protocols TLSv1.2 TLSv1.3;
    ssl_ciphers HIGH:!aNULL:!MD5;

    location / {
        proxy_pass http://localhost:3000;
        proxy_set_header Host $host;
        proxy_set_header X-Real-IP $remote_addr;
        proxy_set_header X-Forwarded-For $proxy_add_x_forwarded_for;
        proxy_set_header X-Forwarded-Proto $scheme;
    }
}
The same thing in a Caddyfile:
# Caddy — 3 lines
api.example.com {
    reverse_proxy localhost:3000
}
Caddy’s reverse_proxy directive sets all the standard proxy headers automatically. HTTPS, redirects, certificate management — all defaults.
Logs and observability
Caddy logs go to systemd-journald by default. Tail with:
journalctl -u caddy -fFor per-site access logs, add an explicit block:
example.com {
    root * /var/www/example.com
    file_server
    log {
        output file /var/log/caddy/example.com.log
        format json
    }
}
Troubleshooting
“Caddy can’t get a certificate”
Almost always DNS or firewall. Caddy uses HTTP-01 challenge by default, which means Let’s Encrypt connects to your server on port 80. Your domain must resolve to the server’s public IP, and the server must accept inbound TCP 80 from the internet. journalctl -u caddy shows the exact ACME error.
“Caddyfile reload fails after my edit”
Validate syntax before reloading: caddy validate --config /etc/caddy/Caddyfile. Common mistakes are missing closing braces and indentation that confuses the parser (Caddy doesn’t enforce indentation but mixed tabs and spaces can cause issues).
“PHP-FPM site shows ‘File not found’ errors”
The socket path varies by PHP version: /run/php/php8.4-fpm.sock on Ubuntu 24.04 with PHP 8.4. Check what’s actually there: ls /run/php/. Update the php_fastcgi directive to match.
Yes, out of the box on Caddy 2.6+. HTTP/3 is enabled by default for HTTPS sites; clients that support it (Chrome, Firefox, Safari 14+) negotiate up to HTTP/3 automatically. You’ll see the protocol in browser DevTools’ Network tab.
Yes. The reverse_proxy directive accepts multiple upstreams: reverse_proxy localhost:3000 localhost:3001 localhost:3002. Default load-balancing policy is round-robin; you can switch to least-connections, IP-hash, or weighted with one extra line. For complex L7 load balancing, HAProxy or nginx remain the experts.
Yes, but you need to enable the Real-IP plugin so Caddy sees the original client IP from Cloudflare’s CF-Connecting-IP header instead of treating every request as coming from Cloudflare’s edge IPs. Add servers { trusted_proxies cloudflare } to the Caddyfile.
Don’t migrate — let Caddy provision its own. Caddy stores certificates in /var/lib/caddy/.local/share/caddy/certificates/ separately from certbot’s /etc/letsencrypt/. The first time you start Caddy for a hostname, it provisions fresh — takes about 30 seconds. Your existing certbot certs stay in place until you uninstall certbot.
Not in the standard build — rate limiting requires a plugin. Caddy is modular: build with extra modules via xcaddy, or use Caddy plus an external rate-limiter like Varnish. For typical hobby use, Cloudflare’s free rate-limit rules in front of Caddy are usually enough.
Within 10-15% on most workloads, with Caddy slightly behind on raw requests-per-second at extreme load. For sites under 10K requests/sec, the difference is invisible. The performance gap closes further with HTTP/3 enabled, where Caddy is on par or ahead of nginx because nginx’s HTTP/3 support is newer and less optimised. Pick based on config simplicity, not benchmarks.
Related guides
- Install Apache on Ubuntu — the other major web-server alternative.
- nginx reverse proxy for Node.js — the traditional setup Caddy simplifies.
- Let’s Encrypt with Certbot — the manual certificate flow Caddy replaces.
- Configure nginx for WordPress — for the nginx side of the comparison.
Caddy’s full documentation is at caddyserver.com/docs, including the Caddyfile reference and the JSON config API.