Once a Laravel table is in production, you shouldn’t edit the original migration to add new columns — that only works on a fresh database, and it won’t affect anyone else’s running environment. The correct pattern is to generate a new migration that alters the existing table. In this guide I’ll walk through adding multiple columns to an existing table in Laravel, plus the gotchas around defaults and column positioning.
Originally published October 14, 2023, rewritten and updated April 17, 2026.
TL;DR
Run php artisan make:migration add_columns_to_transactions_table --table=transactions, add your columns inside the Schema::table() closure in up(), drop them in down(), then php artisan migrate.
Step 1: Create the Migration
Use a descriptive name that reflects what the migration does. A convention that reads well later in database/migrations/ is add_{columns}_to_{table}_table:
php artisan make:migration add_vehicle_id_and_remarks_to_transactions_table --table=transactionsThe --table=transactions flag tells Artisan to scaffold the file with Schema::table() (edit existing) instead of Schema::create() (new table). This avoids a common mistake where developers run Schema::create() on an already-existing table and get a “table already exists” error.
Step 2: Fill In the up() and down() Methods
Open the generated file in database/migrations/. Add the new columns inside the up() closure:
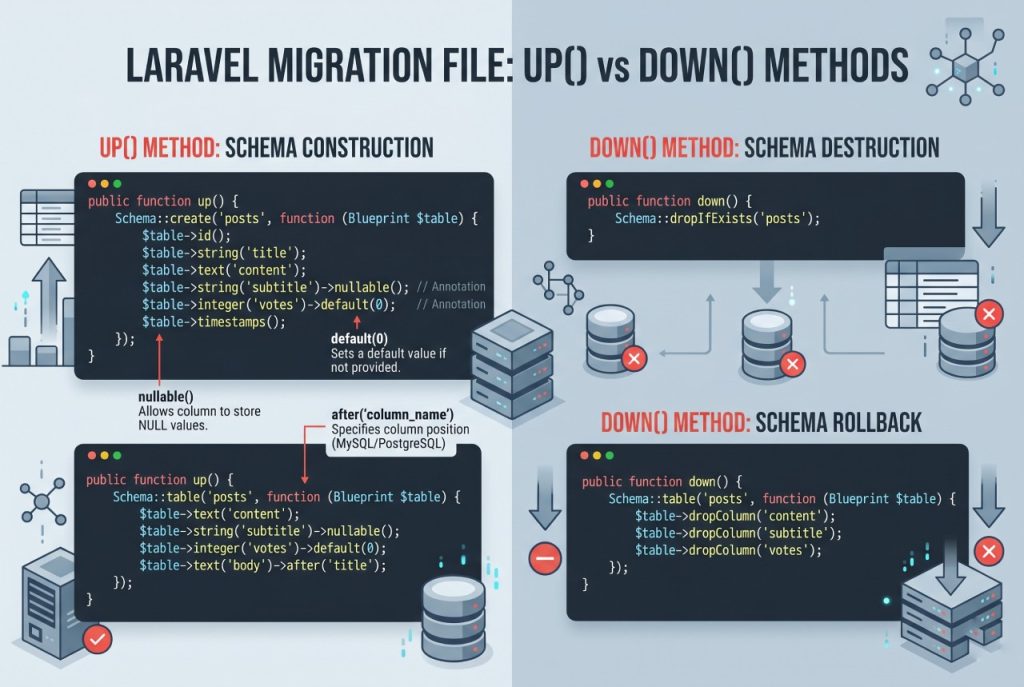
public function up(): void
{
    Schema::table('transactions', function (Blueprint $table) {
        $table->unsignedBigInteger('vehicle_id')->nullable();
        $table->string('remarks')->nullable();
    });
}
Marking new columns nullable() is almost always what you want when altering a populated table. Without it, MySQL requires a default value for existing rows — otherwise the migration fails on the ALTER statement.
Always write a matching down() that reverses the change, so php artisan migrate:rollback works cleanly:
public function down(): void
{
    Schema::table('transactions', function (Blueprint $table) {
        $table->dropColumn(['vehicle_id', 'remarks']);
    });
}
Passing an array to dropColumn() is cleaner than calling it multiple times — Laravel issues a single ALTER statement.
Step 3: Run the Migration
php artisan migrateLaravel records the migration in the migrations table so it doesn’t run twice. To see what’s pending, use php artisan migrate:status. In production, run migrations as part of your deploy pipeline — never manually on a live server without a database backup first.
Controlling Column Position
By default new columns are appended to the end of the table. If you need a specific position (MySQL only), chain after():
$table->string('remarks')->nullable()->after('vehicle_id');Position rarely matters for application logic, but it matters for people reading describe transactions output at 2am during an incident.
Adding a Column With a Default Value
If you can’t make a column nullable (say, a status enum that must be populated), provide a default() so existing rows get a valid value:
$table->string('status')->default('pending');This backfills all existing rows with 'pending' as part of the ALTER TABLE.
Troubleshooting
Cannot Add Column with NOT NULL and No Default
MySQL needs to know what value to put in the new column for existing rows. Fix either by adding ->nullable() or ->default(...). If neither is appropriate, run the migration in two steps: add the column as nullable, backfill data, then run a second migration that makes it non-null.
Table “transactions” Already Exists
You used Schema::create() instead of Schema::table(). Regenerate the migration with the --table= flag (not --create=), or edit the file to use Schema::table().
Frequently Asked Questions
Run <code>php artisan make:migration add_columns_to_{table}_table –table={table}</code>. The <code>–table=</code> flag scaffolds the file with <code>Schema::table()</code> so you can alter the existing table without errors.
When you add a NOT NULL column to a table that already has rows, the database needs a value to put in each existing row. Either <code>->nullable()</code> or <code>->default(…)</code> tells MySQL what to use. Without one of them the ALTER TABLE fails.
Chain <code>->after(‘column_name’)</code> on MySQL, e.g. <code>$table->string(‘remarks’)->nullable()->after(‘vehicle_id’);</code>. This is MySQL-specific. PostgreSQL and SQLite always append.
Run <code>php artisan migrate:rollback</code>. This executes the <code>down()</code> method of the most recent batch of migrations. If your <code>down()</code> correctly drops the added columns, the table is restored.
Related Guides
- How to Change a MySQL Column Type in Laravel Migration
- How to Add Foreign Keys in Laravel Migration
- How to Install Laravel
For the full list of column types and modifiers, see the official Laravel migrations documentation.