If you’ve already switched to SSH keys and disabled passwords, you’ve stopped the loudest attackers. fail2ban stops the quiet ones — bots probing your nginx 404 logs, WordPress login pages, and any other service that exposes a “wrong attempt” signal. This guide shows how to install fail2ban on Ubuntu, configure the SSH jail correctly, add nginx and WordPress filters, and avoid the one configuration mistake that bans you from your own server.
- TL;DR
- How fail2ban actually works
- Step 1 — Install fail2ban
- Step 2 — Create your own jail.local (never edit jail.conf)
- Step 3 — Add nginx jails
- Step 4 — Add a WordPress jail
- Step 5 — Apply the config
- Day-to-day operations
- Troubleshooting
- “fail2ban started but no IPs are being banned”
- “I banned myself”
- “Filter not matching even though I see the attack in the log”
- Related guides
TL;DR
sudo apt install fail2ban on Ubuntu 22.04 / 24.04 / 26.04, create /etc/fail2ban/jail.local (never edit jail.conf — it gets overwritten on every apt update), enable the SSH jail, add your own IP to ignoreip, restart with systemctl restart fail2ban, and verify with fail2ban-client status. nginx and WordPress filters are extra [jail-name] blocks in the same file.
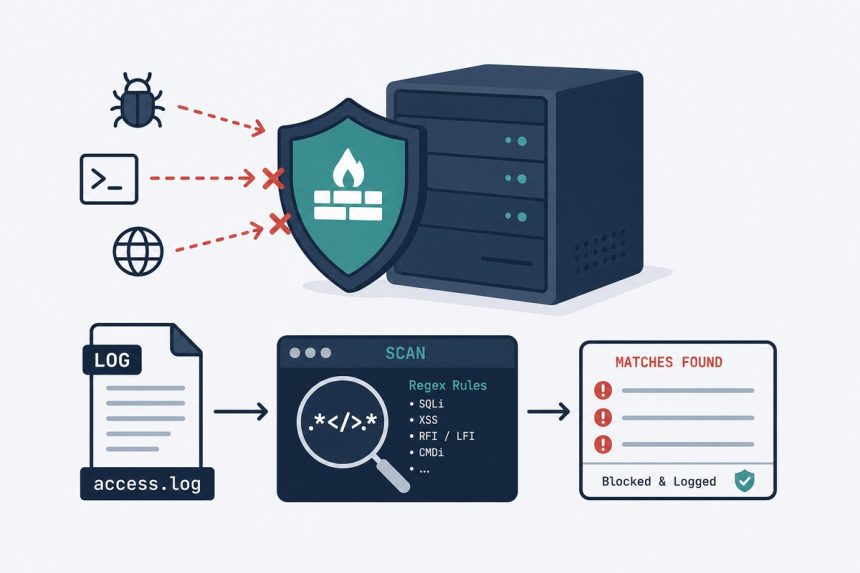
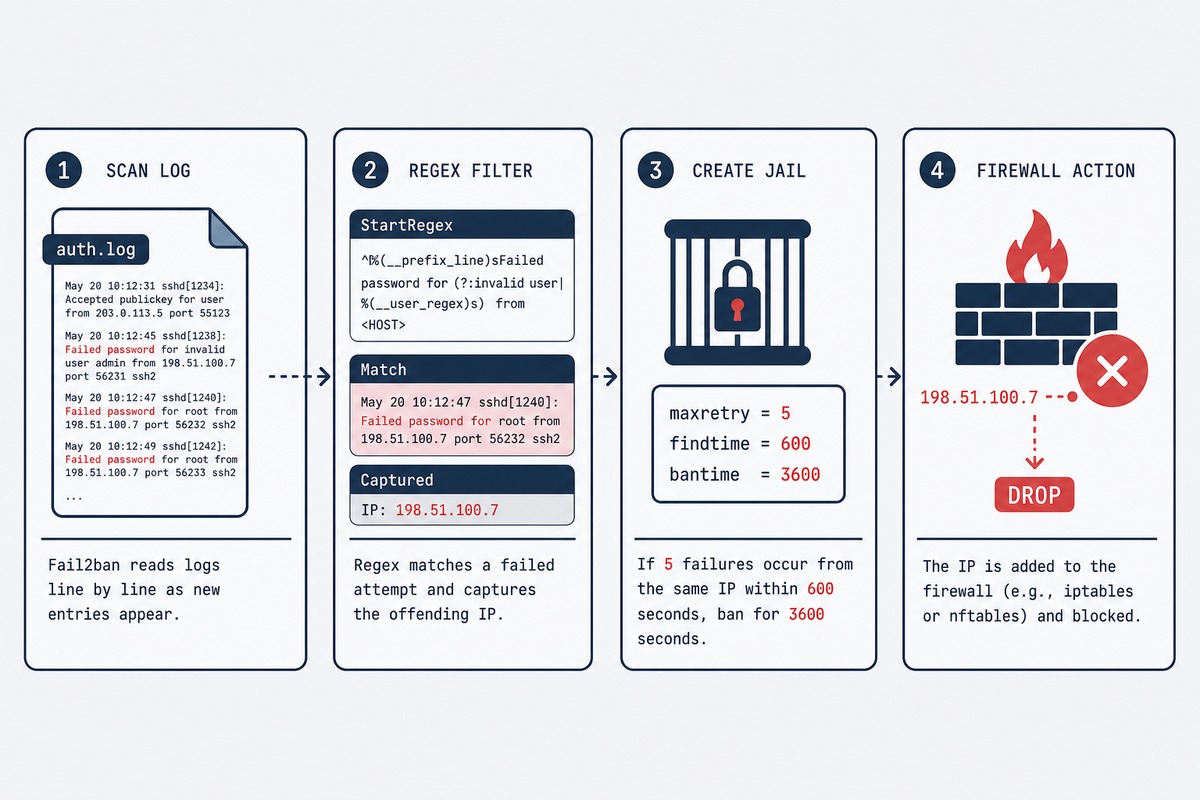
How fail2ban actually works
fail2ban is a log scanner wired to a firewall trigger. It tails service log files (/var/log/auth.log for SSH, /var/log/nginx/error.log for nginx, etc.), runs each line through a regex called a filter, and if the same source IP fails the filter more than maxretry times within findtime seconds, fail2ban tells the kernel firewall (iptables, nftables, or ufw) to drop that IP for bantime seconds.
It doesn’t read your application code, doesn’t patch anything in the protected service, and adds no runtime overhead to legitimate traffic — only banned IPs hit the kernel-level drop. Memory footprint is around 30 MB.
Step 1 — Install fail2ban
sudo apt update
sudo apt install fail2ban
The package ships with the daemon, a default /etc/fail2ban/jail.conf, and pre-built filters in /etc/fail2ban/filter.d/. After install, fail2ban is already running with the default [sshd] jail enabled.
Step 2 — Create your own jail.local (never edit jail.conf)
The cardinal rule: don’t edit jail.conf. Every apt upgrade of the fail2ban package overwrites it. Your customisation lives in jail.local, which fail2ban reads after jail.conf and which apt leaves alone.
sudo nano /etc/fail2ban/jail.localStart with a sensible global default + SSH jail:
[DEFAULT]
# Ban for 1 hour after 5 failures in 10 minutes
bantime = 1h
findtime = 10m
maxretry = 5

# Never ban these IPs — your office, your home, monitoring
ignoreip = 127.0.0.1/8 ::1 198.51.100.42

# Use nftables (the modern backend)
banaction = nftables-multiport
banaction_allports = nftables-allports

[sshd]
enabled = true
port = ssh
filter = sshd
logpath = %(sshd_log)s
backend = %(sshd_backend)s
Critical: put your own public IP in ignoreip before restarting fail2ban. If you accidentally trigger the SSH jail from your own machine (a few failed key attempts during testing), you’ll be locked out for bantime. The CIDR notation is fine: 198.51.100.0/24 covers a small office subnet.
Find your current public IP with curl ifconfig.me from the machine you’ll be SSHing from.
Step 3 — Add nginx jails
Append these to the same /etc/fail2ban/jail.local:
[nginx-http-auth]
enabled = true
port = http,https
logpath = /var/log/nginx/error.log

[nginx-badbots]
enabled = true
port = http,https
filter = nginx-badbots
logpath = /var/log/nginx/access.log
maxretry = 2

[nginx-noscript]
enabled = true
port = http,https
filter = nginx-noscript
logpath = /var/log/nginx/access.log
maxretry = 6

[nginx-noproxy]
enabled = true
port = http,https
filter = nginx-noproxy
logpath = /var/log/nginx/access.log
maxretry = 2- nginx-http-auth — bans IPs that fail HTTP Basic Auth (used for protected admin paths).
- nginx-badbots — bans known scrapers and exploit scanners by User-Agent.
- nginx-noscript — bans IPs hitting
.php,.aspx, or other script extensions on a static-only site. - nginx-noproxy — bans IPs trying to use your nginx as an open proxy (the classic
CONNECTprobe).
Step 4 — Add a WordPress jail
fail2ban doesn’t ship a WordPress filter out of the box. Create one in /etc/fail2ban/filter.d/wordpress.conf:
[Definition]
failregex = ^<HOST> .* "POST .*wp-login\.php
            ^<HOST> .* "POST .*xmlrpc\.php
ignoreregex =
Then add the jail to jail.local:
[wordpress]
enabled = true
port = http,https
filter = wordpress
logpath = /var/log/nginx/access.log
maxretry = 3
findtime = 5m
bantime = 24h
The longer bantime here is deliberate — WordPress brute-force bots come back the moment they’re unbanned. A 24-hour ban moves them on to other targets.
Step 5 — Apply the config
sudo systemctl restart fail2ban
sudo systemctl enable fail2ban
Verify everything’s running:
sudo fail2ban-client status
sudo fail2ban-client status sshd
The first command lists active jails; the second shows the SSH jail’s currently-banned IPs and total bans. Within an hour on a public-facing server, you’ll see banned IPs accumulate.
Day-to-day operations
- Unban an IP:
sudo fail2ban-client set sshd unbanip 198.51.100.42 - Ban an IP manually:
sudo fail2ban-client set sshd banip 198.51.100.42 - See total bans across all jails:
sudo fail2ban-client status - Reload after config change:
sudo systemctl reload fail2ban(faster than restart, doesn’t lose existing bans) - View banned IPs in iptables/nftables directly:
sudo nft list table inet f2b-table
Troubleshooting
“fail2ban started but no IPs are being banned”
Run sudo fail2ban-client status sshd — if “Currently failed” is increasing, fail2ban is seeing failures; if it’s zero, the log path is wrong. On modern Ubuntu (22.04+), SSH logs go to systemd-journald, not /var/log/auth.log. Set backend = systemd in the [sshd] block.
“I banned myself”
Use your VPS provider’s web console to log in directly, then sudo fail2ban-client set sshd unbanip YOUR_IP. Add yourself to ignoreip in jail.local. Reload.
“Filter not matching even though I see the attack in the log”
Test the regex against the actual log line with fail2ban-regex /var/log/nginx/access.log /etc/fail2ban/filter.d/wordpress.conf. It’ll tell you exactly how many lines match and which lines didn’t. The most common cause is log format mismatch — custom nginx log_format directives don’t match the default filter regexes.
Yes, and it’s still worth running. Keys block password brute-force, but fail2ban catches other attack patterns — WordPress xmlrpc abuse, nginx HTTP Basic Auth probing, bad-bot scanners, and any service-level abuse that shows up in logs. The SSH jail does less work in a key-only setup, but the nginx and WordPress jails are doing the real protection.
1 hour is a sane default for SSH and most service jails. For WordPress login/xmlrpc attacks, 24 hours is better — the bots are aggressive and come back fast. For repeat offenders, fail2ban supports a recidive jail that watches its own logs and applies a multi-day ban to IPs that get banned repeatedly. The recidive jail is in the default jail.conf; enable it in your jail.local.
Both, plus nftables. ufw is a frontend for iptables/nftables, so the underlying integration is the same. The recommended banaction on modern Ubuntu (22.04+) is nftables-multiport, which works regardless of whether you also use ufw. On older systems, iptables-multiport is the default.
No measurable impact in normal use. The daemon uses about 30 MB of RAM and scans logs in batches. Banned IPs are dropped by the kernel firewall before any service sees them, which is actually faster than letting them connect and fail. The only scenario with noticeable cost is enormous log files (gigabytes) — set maxlines in jail.local to limit how much history fail2ban scans on startup.
They’re complementary, not alternatives. Cloudflare drops attacks at the edge (before traffic reaches your server), which is excellent for high-volume scrapers and DDoS. fail2ban handles attacks that get past Cloudflare — direct-IP scans, traffic from misconfigured Cloudflare rules, and brute force on services that aren’t behind the proxy at all (SSH, mail). Use both.
sudo fail2ban-client set <jail> unbanip <ip>. The jail name is the one in square brackets in jail.local (e.g. sshd, nginx-http-auth, wordpress). For a full unban across all jails: sudo fail2ban-client unban <ip>.
Related guides
- Set up SSH key authentication on Ubuntu — first line of defence before fail2ban does anything.
- Harden an Ubuntu VPS — the broader hardening checklist fail2ban fits into.
- Change the SSH port on Linux — moves brute-force noise off port 22 entirely.
- Let’s Encrypt with Certbot — for the HTTPS that nginx-http-auth protects.
For the full fail2ban configuration reference, the official fail2ban wiki documents every option, filter, and jail action.