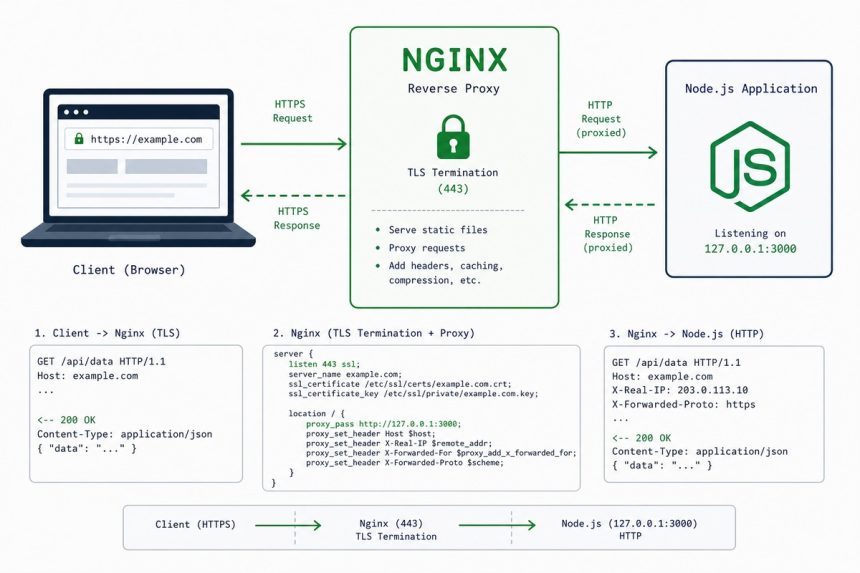
To set up Nginx as a reverse proxy for a Node.js app on Ubuntu, run your Node process on a high port (typically 3000), then create an Nginx server block on port 80/443 that proxy_passes every request to http://localhost:3000. The result is one public-facing Nginx for TLS termination and static serving, with Node handling the application logic in its private port.
- Why front Node with Nginx
- Step 1 — get Node and the app running
- Step 2 — install Nginx
- Step 3 — create the reverse-proxy server block
- Step 4 — point DNS and verify
- Step 5 — process management with PM2
- Step 5 (alternative) — systemd unit
- Step 6 — add SSL
- Step 7 — multiple apps on one server
- Tune for production
- Frequently asked questions
- Related guides
- References
Last verified: 2026-05-17 on Ubuntu 24.04 with Nginx 1.24 and Node.js 20 LTS.
Why front Node with Nginx
- TLS termination. Nginx does the cert handshake, decrypts, and passes plain HTTP upstream. Faster than Node’s TLS, and Certbot’s
--nginxplugin handles renewal automatically. - Static-file serving. Public files (images, CSS, the built JS bundle) serve directly from Nginx without ever touching Node — much faster and uses less memory.
- Slow-client protection. Nginx buffers the request from a slow client before passing it on, so Node’s event loop isn’t tied up waiting for a 5 KB POST to dribble in over a flaky network.
- Multiple apps, one server. Run App A on port 3000, App B on 3001, route each by hostname or path in Nginx.
- Process isolation. Node runs as an unprivileged user on a non-public port; Nginx is the only thing facing the internet.
Step 1 — get Node and the app running
Install Node if you haven’t already (see How to Install the Latest Node.js on Ubuntu) and start the app on a high port:
cd /var/www/myapp
node server.js
# App listening on http://localhost:3000
Confirm the app responds on its port from the server itself:
curl -sI http://localhost:3000
# HTTP/1.1 200 OK
If curl can reach it, Nginx can too. Leave Node running for the moment; we’ll wire up process management in Step 5.
Step 2 — install Nginx
sudo apt update
sudo apt install -y nginx

sudo systemctl enable --now nginx
sudo ufw allow 'Nginx Full'                # opens 80 and 443
Visit http://your-server-ip in a browser — you should see the default Nginx landing page. That’s the proof Nginx is listening on port 80; we’ll replace that landing page with the reverse-proxy config next.
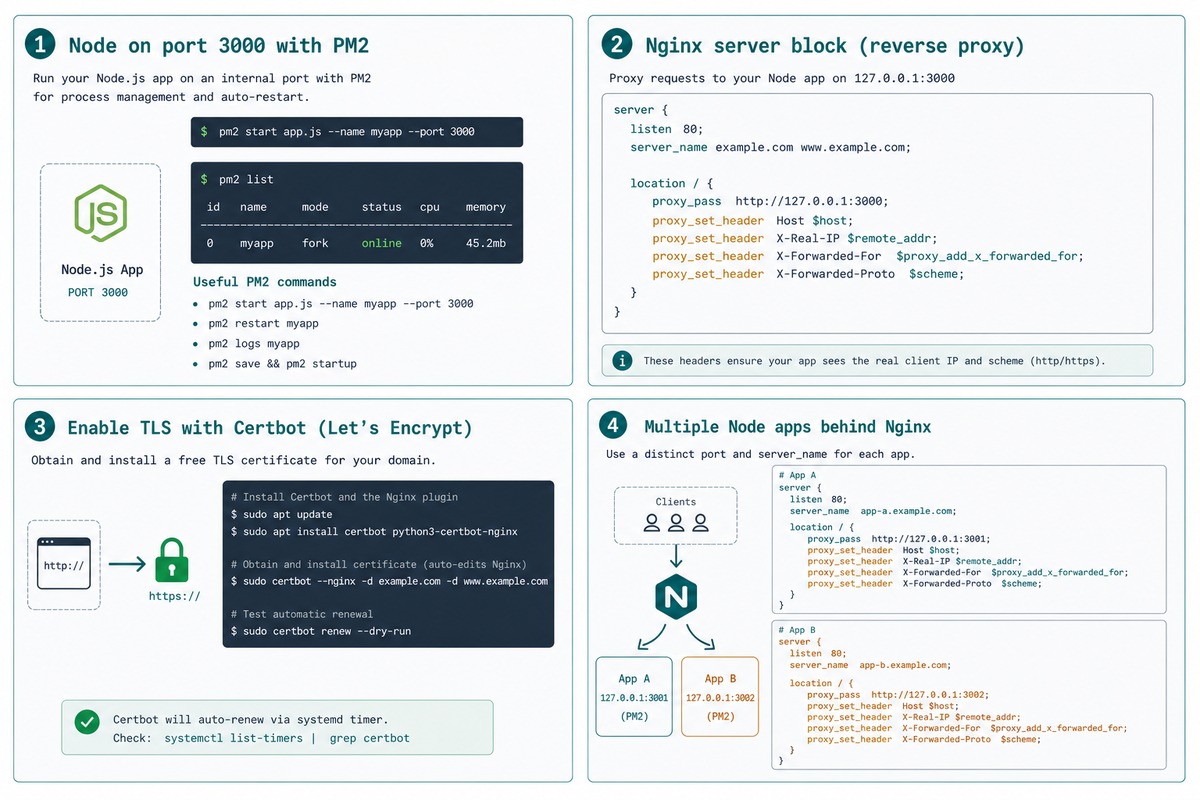
Step 3 — create the reverse-proxy server block
sudo tee /etc/nginx/sites-available/myapp.conf >/dev/null << 'EOF'
server {
    listen 80;
    listen [::]:80;
    server_name myapp.example.com;

    # Generous request body — bump if your app uploads large files
    client_max_body_size 50M;

    location / {
        proxy_pass         http://127.0.0.1:3000;

        # Pass the original request details upstream
        proxy_set_header Host              $host;
        proxy_set_header X-Real-IP         $remote_addr;
        proxy_set_header X-Forwarded-For   $proxy_add_x_forwarded_for;
        proxy_set_header X-Forwarded-Proto $scheme;

        # WebSocket / long-lived connections
        proxy_http_version 1.1;
        proxy_set_header   Upgrade    $http_upgrade;
        proxy_set_header   Connection "upgrade";

        # Sensible timeouts (raise for long-running endpoints)
        proxy_connect_timeout 60s;
        proxy_send_timeout    60s;
        proxy_read_timeout    60s;
    }
}
EOF

# Enable the site
sudo ln -s /etc/nginx/sites-available/myapp.conf /etc/nginx/sites-enabled/

# Disable the default landing page
sudo rm -f /etc/nginx/sites-enabled/default

# Test the config
sudo nginx -t
# nginx: configuration file /etc/nginx/nginx.conf test is successful

# Reload (no dropped connections)
sudo systemctl reload nginx
The four proxy_set_header lines are the canonical reverse-proxy preamble. They tell the Node app:
Host: the hostname the client requested (so the Node app can route by host).X-Real-IP: the client’s actual IP. Without this, every request looks like it came from127.0.0.1.X-Forwarded-For: the chain of proxies the request passed through.X-Forwarded-Proto:httporhttps— Node needs this to know whether to emit secure cookies.
In Express, read these via req.ip and req.protocol — they work correctly after you call app.set('trust proxy', 1) to tell Express to trust the headers Nginx sets.
Step 4 — point DNS and verify
Set an A record for myapp.example.com pointing at the server’s public IP. After DNS propagates:
curl -sI http://myapp.example.com
# HTTP/1.1 200 OK
# Server: nginx/1.24.0
The Server: nginx/... header confirms Nginx is serving the request. The body of the response is whatever Node returned.
Step 5 — process management with PM2
# Install PM2 globally
sudo npm install -g pm2

# Start the app under PM2
cd /var/www/myapp
pm2 start server.js --name myapp

# Save the process list and install a startup script
pm2 startup systemd                          # prints a command to run
# Run that command (it varies by OS)
pm2 save
From now on PM2 keeps the Node process running, restarts it if it crashes, and brings it back on boot. Useful commands:
pm2 list                  # what's running
pm2 logs myapp            # tail logs
pm2 restart myapp         # restart
pm2 reload  myapp         # zero-downtime reload (uses cluster mode)
pm2 stop myapp
pm2 monit                 # live CPU/memory dashboard
Step 5 (alternative) — systemd unit
If you’d rather skip PM2, a tiny systemd unit does the same job:
sudo tee /etc/systemd/system/myapp.service >/dev/null << 'EOF'
[Unit]
Description=My Node.js App
After=network.target

[Service]
Type=simple
User=www-data
WorkingDirectory=/var/www/myapp
ExecStart=/usr/bin/node server.js
Restart=on-failure
RestartSec=5s
Environment=NODE_ENV=production

# Logs go to journald
StandardOutput=journal
StandardError=journal

[Install]
WantedBy=multi-user.target
EOF

sudo systemctl daemon-reload
sudo systemctl enable --now myapp
sudo systemctl status myapp

# Tail logs
journalctl -u myapp -f
Systemd handles restart-on-crash and start-on-boot. No extra dependency. Logs go to journald, queryable with the same commands you use for every other service.
Step 6 — add SSL
sudo apt install -y certbot python3-certbot-nginx
sudo certbot --nginx -d myapp.example.com
Certbot picks up the existing Nginx config, fetches a Let’s Encrypt certificate, adds the SSL server block, and rewrites the port-80 block to redirect to HTTPS. See How to Set Up Let’s Encrypt SSL with Certbot for the full walkthrough.
After the cert is in place, your Node app sees X-Forwarded-Proto: https on every request — make sure the app honours it (in Express: app.set('trust proxy', 1)).
Step 7 — multiple apps on one server
Run each Node app on its own port (3000, 3001, 3002…) and create one Nginx server block per hostname:
# /etc/nginx/sites-available/app-a.conf
server {
    listen 80;
    server_name app-a.example.com;
    location / { proxy_pass http://127.0.0.1:3000; /* ...same proxy_set_header block... */ }
}

# /etc/nginx/sites-available/app-b.conf
server {
    listen 80;
    server_name app-b.example.com;
    location / { proxy_pass http://127.0.0.1:3001; /* ... */ }
}
Enable both with ln -s into sites-enabled/, reload Nginx, and you’re hosting two distinct Node apps on the same box.
Tune for production
# Inside the server { } block, beyond the basics:

# Serve static assets directly from Nginx (skip Node entirely)
location ~* \.(jpg|jpeg|png|gif|ico|css|js|svg|woff|woff2)$ {
    root /var/www/myapp/public;
    expires 1y;
    add_header Cache-Control "public, immutable";
    try_files $uri @nodejs;
}

location @nodejs {
    proxy_pass http://127.0.0.1:3000;
    # (proxy_set_header lines as before)
}

# Gzip text content
gzip on;
gzip_types text/plain text/css application/json application/javascript;
gzip_min_length 1000;
The static-file location block intercepts requests for assets and serves them from disk without ever invoking Node. With a year-long cache header, CDN-edge caching makes the second visit essentially free.
Frequently asked questions
It can. https.createServer() in Node accepts a cert and key. The reasons to front it with Nginx anyway: (1) Nginx is faster and lower-memory for TLS handshakes and static-file serving; (2) Certbot’s --nginx plugin automates renewal — wiring that up against a custom Node server is a project; (3) Nginx buffers slow client requests so Node’s event loop isn’t tied up; (4) you can run multiple Node apps on the same box behind different subdomains. The Node-only path is fine for hobby projects; for anything user-facing, the reverse proxy pays for itself.
PM2 is process-manager-as-application. It handles auto-restart, clustering, log rotation, and zero-downtime deploys — comes with an interactive CLI and a web dashboard. Great for solo developers managing their own deploys. systemd is the OS-native way. A 15-line unit file gets you auto-restart and integration with journald, no extra dependency. Use systemd for servers you’ll hand off to ops; use PM2 when the convenience features (zero-downtime reload, easy clustering) save real time.
One Nginx server block per app, each proxy_passing to a different upstream port. App A on 3000, App B on 3001, etc. Use distinct hostnames (subdomains or path prefixes) or distinct server_name directives. Run each Node process under its own user for isolation. PM2 makes managing many processes easier; with systemd, write one unit file per app.
Nginx has a default 1 MB client_max_body_size — uploads larger than that get rejected with 413. Bump it: client_max_body_size 50M; (or your real upload ceiling) inside the server block. Also check proxy_read_timeout if your Node app takes more than 60 seconds to process the upload — raise it to proxy_read_timeout 300s; for long-running endpoints.
Related guides
- How to Install the Latest Node.js on Ubuntu
- How to Configure Nginx for a Subdirectory
- How to Redirect www to non-www in Nginx
- How to Set Up Let’s Encrypt SSL with Certbot on Ubuntu
- How to Run a Node.js Application from a Windows .bat File
References
Nginx HTTP proxy module: nginx.org/en/docs/http/ngx_http_proxy_module.html. PM2 documentation: pm2.keymetrics.io/docs. Node.js documentation: nodejs.org/en/docs. Express trust proxy: expressjs.com/en/guide/behind-proxies.html.