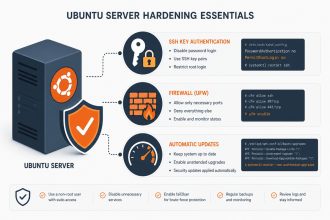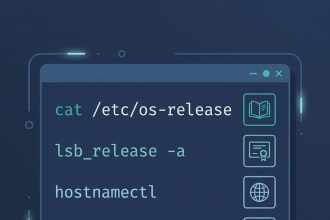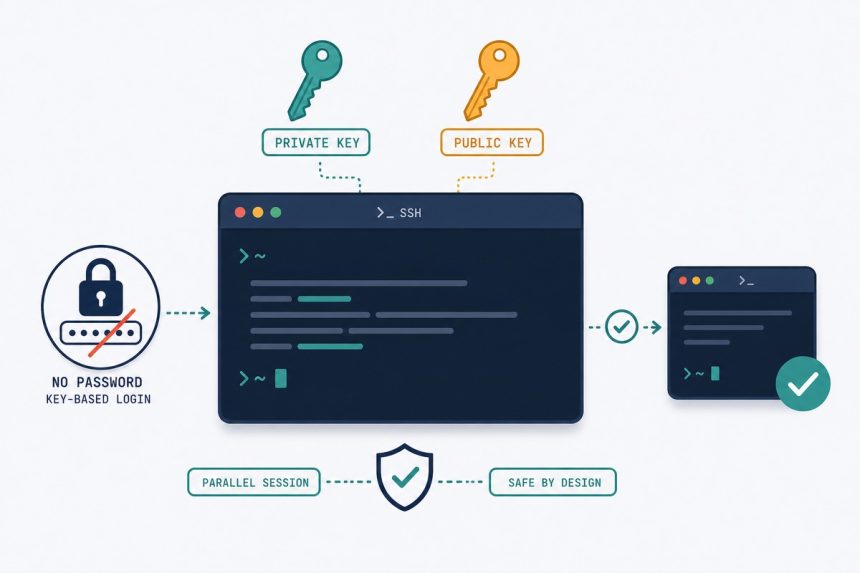
Setting up SSH key authentication on Ubuntu takes about ten minutes and gives you the single biggest security upgrade a fresh VPS can get — brute-force password attacks stop working the moment you switch to keys. Logins also get faster, you stop typing the same password forty times a day, and (if you follow the lockout-protection step) you can’t actually accidentally cut yourself off the server. This is the 2026 walkthrough with every gotcha that bites first-timers, including the one that breaks 80% of failed attempts.
- TL;DR
- Why keys beat passwords (in 2026, by a wide margin)
- Prerequisites
- Step 1 — Generate the key pair on your local machine
- Step 2 — Copy the public key to the server
- Step 3 — Test the key login
- Step 4 — Disable password auth (safely)
- Multi-device setup with ~/.ssh/config
- Troubleshooting
- “Permission denied (publickey)”
- “It still asks for the server password instead of the key passphrase”
- “I locked myself out anyway”
- Related guides
TL;DR
On your local machine: ssh-keygen -t ed25519 -C "[email protected]" to generate the key, ssh-copy-id user@server to upload the public part, then ssh user@server to confirm it works. On the server, edit /etc/ssh/sshd_config — set PasswordAuthentication no and PermitRootLogin prohibit-password — then sudo systemctl restart ssh. Test one more login from a fresh terminal before you disconnect the original. That’s the lockout protection.
Why keys beat passwords (in 2026, by a wide margin)
A fresh VPS with port 22 open to the internet logs roughly 200–800 brute-force password attempts per hour — automated bots crawling IPv4 space looking for weak SSH. Most attempts use the default root account and common passwords. Disabling password auth makes those attempts physically impossible: no password is ever accepted, full stop.
The cryptographic comparison is also lopsided. A human-memorisable password is at most 16 characters of practical entropy — about 100 bits if you use a passphrase generator and even less if you don’t. An ed25519 keypair carries 256 bits of cryptographic strength. There is no known practical attack against a correctly-generated ed25519 key; the entire question moves from “guessable” to “mathematically infeasible”.
Prerequisites
- An Ubuntu server (20.04, 22.04, 24.04, or 26.04 — instructions are identical) you can SSH into right now using a password.
- A local machine running Linux, macOS, or Windows 10+ (with WSL or PowerShell’s built-in OpenSSH).
sudoon the server, or root access.- Optional but recommended: a web console / serial console from your VPS provider as a safety net (DigitalOcean, Vultr, Hetzner, Linode, OVH all have one — find it before you start so you know where it is if needed).
Step 1 — Generate the key pair on your local machine
On your local computer (not the server), run:
ssh-keygen -t ed25519 -C "[email protected]"-t ed25519picks the algorithm. Don’t usersa— ed25519 is the modern default.-C "[email protected]"is just a label inside the public key file. It helps you identify the key later if you have multiple. Use anything readable — your email, a machine name, “laptop-2026” — it doesn’t have to be a real address.
When prompted for a file path, accept the default (~/.ssh/id_ed25519). When prompted for a passphrase, set one. ssh-agent will unlock it once per session so you don’t type it on every connection — but having a passphrase means a stolen private-key file can’t be used by itself.
You’ll end up with two files in ~/.ssh/:
id_ed25519— your private key. Never share. Never commit. Permissions should be600(read/write owner only).id_ed25519.pub— your public key. Safe to share, post in GitHub profile, email to a colleague. This is the only one that goes on the server.
Step 2 — Copy the public key to the server
The easy path:
ssh-copy-id user@serverReplace user with your username on the server and server with the hostname or IP. You’ll be prompted for the server password one last time. ssh-copy-id appends your public key to ~/.ssh/authorized_keys and sets correct file permissions (~/.ssh at 700, authorized_keys at 600) — which is the part most manual attempts get wrong.
If ssh-copy-id isn’t available (default Git Bash on Windows, some minimal images), use the manual one-liner instead:
cat ~/.ssh/id_ed25519.pub | ssh user@server "mkdir -p ~/.ssh && chmod 700 ~/.ssh && cat >> ~/.ssh/authorized_keys && chmod 600 ~/.ssh/authorized_keys"Step 3 — Test the key login
ssh user@serverYou should be prompted for your key passphrase (not the server password) the first time, then dropped onto the server’s shell. On subsequent sessions in the same desktop login, ssh-agent caches the unlock and you connect with no prompt at all.
If you’re prompted for the server password instead of the key passphrase, the key isn’t being accepted. Don’t proceed to step 4 — fix this first. The Troubleshooting section below covers the three common causes.
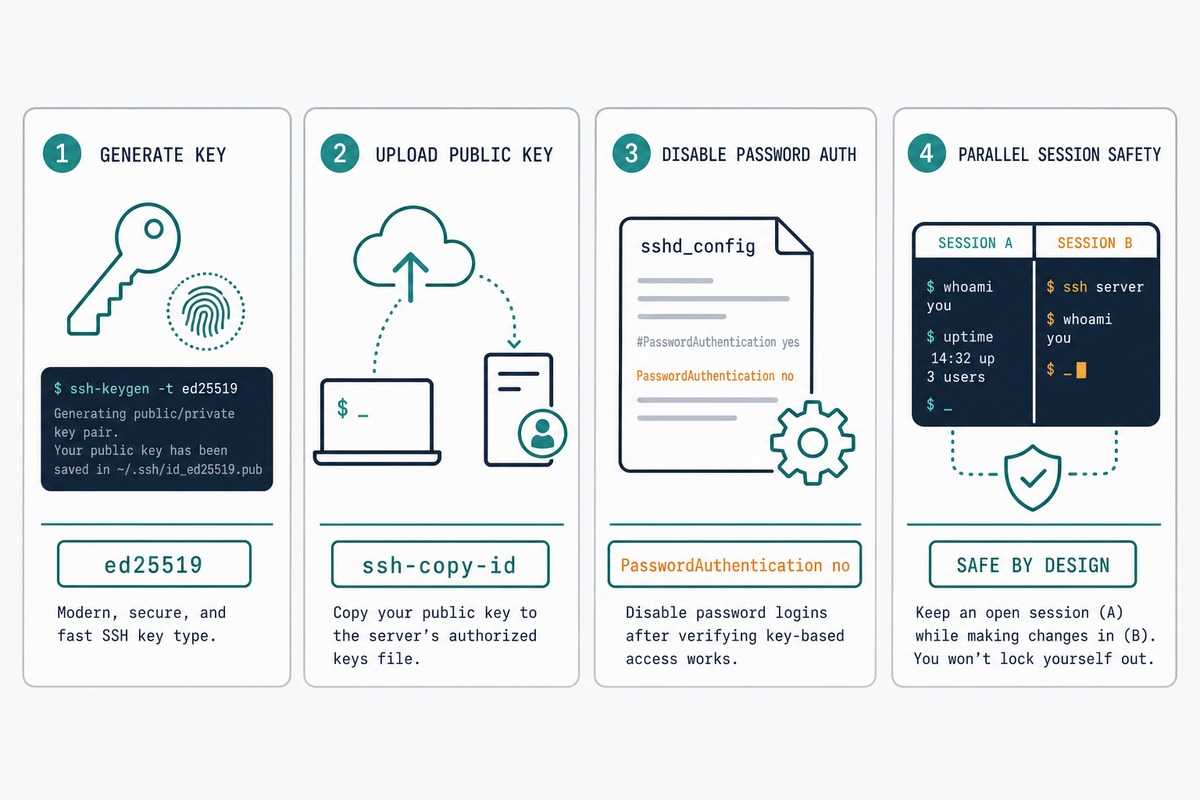
Step 4 — Disable password auth (safely)
This is where people lock themselves out. The trick is to keep your current SSH session open in one terminal while you test the change from a separate terminal. If anything’s wrong, the open session is still your way back in.
From inside your current SSH session, edit /etc/ssh/sshd_config:
sudo nano /etc/ssh/sshd_configSet these (uncomment if they’re commented):
PasswordAuthentication no
PermitRootLogin prohibit-password
ChallengeResponseAuthentication no
UsePAM yes
Save the file. Before restarting sshd, validate the config — a syntax error here is what causes the worst lockouts:
sudo sshd -tIf sshd -t prints nothing, the config is valid. If it prints errors, fix them before continuing. Then restart sshd:
sudo systemctl restart sshOn Ubuntu 22.04 the service is named ssh; on some images it’s sshd. Either works — systemctl will tell you if the name is wrong.
The lockout-protection step
Open a new terminal on your local machine — leave the original SSH session open in the other one — and connect:
ssh user@serverIf the key auth works (no password prompt, you land at the shell), you’re done. Disconnect the original session and breathe out. If it fails, the original session is still your authenticated way in — revert the sshd_config changes, restart sshd, fix the root cause, and try again. Without this parallel-session step, a typo in sshd_config can turn a 10-minute setup into a “find the VPS console” detour.
Multi-device setup with ~/.ssh/config
If you SSH into the same server from multiple computers, generate a separate key on each device (don’t copy the same private key around) and append every public key to the server’s ~/.ssh/authorized_keys. That way, losing one device means removing one line from authorized_keys — you don’t have to rotate the key everywhere.
To make SSH ergonomic across multiple hosts, create ~/.ssh/config on each local machine:
Host prod
  HostName 198.51.100.42
  User wooshaper
  IdentityFile ~/.ssh/id_ed25519

Host staging
  HostName 198.51.100.43
  User wooshaper
  IdentityFile ~/.ssh/id_ed25519
  Port 2222
Now ssh prod works instead of ssh [email protected], and tab completion fills in the Host name. The Port line is useful if you’ve moved SSH off the default 22 — see our guide on changing the SSH port.
Troubleshooting
“Permission denied (publickey)”
Almost always one of three things:
- Public key not in
~/.ssh/authorized_keys. SSH in via password (if still enabled), runcat ~/.ssh/authorized_keys, and check your public key is there. - Wrong permissions on the server.
~/.sshmust be700andauthorized_keysmust be600. SSH silently refuses to use keys from world-writable directories — it’s a security feature, not a bug. Fix withchmod 700 ~/.ssh && chmod 600 ~/.ssh/authorized_keys. - SELinux context issues on RHEL-family servers (irrelevant on Ubuntu but worth noting if you’re switching). Not an Ubuntu problem.
“It still asks for the server password instead of the key passphrase”
SSH didn’t try the right key. Run with verbose output to see which keys are being offered:
ssh -v user@server 2>&1 | grep -E "Offering|Trying"If the right key isn’t being tried, point to it explicitly: ssh -i ~/.ssh/id_ed25519 user@server, or add an IdentityFile line to your ~/.ssh/config.
“I locked myself out anyway”
Use your VPS provider’s web console (every major host has one — usually under “Console” or “Recovery” in the dashboard). It bypasses SSH entirely, gives you a serial-style terminal as root, and lets you re-enable password authentication or fix the key. If you don’t have console access and lost SSH, the server is unrecoverable except via physical access — which is why the parallel-session step in step 4 is important.
ed25519. It’s smaller (256 bits vs 3072+ for equivalent RSA strength), faster to verify, and resistant to certain side-channel attacks that affect RSA implementations. RSA isn’t broken — RSA 4096 keys are still strong — but ed25519 is what every modern guide and OpenSSH default recommends since 2020.
The passphrase encrypts the private key on disk using AES. Without it, anyone who steals the id_ed25519 file has your full SSH access. With a passphrase, they also need the passphrase to use the key. ssh-agent (or your OS keychain on macOS) caches the unlock so you only type the passphrase once per session, not every login.
Technically yes, practically no. The better practice is generating a separate ed25519 key on each device and appending all of their public keys to the server’s ~/.ssh/authorized_keys. That way, if one device is lost or stolen, you remove just that line from authorized_keys — you don’t have to rotate the key across every other device too.
They generate their own keypair on their machine, send you the public part (the .pub file — safe to email), and you append it to /home/teammate/.ssh/authorized_keys on the server (creating the user first if needed). Never share private keys.
No. prohibit-password allows root SSH only via key and blocks password-based root login. Set the value to no if you want to disable root SSH completely (which is the stricter default most production guides recommend, with sudo from a regular user instead).
Use your VPS provider’s web console (DigitalOcean, Vultr, Hetzner, Linode, OVH all have one). The web console is a serial-port-style connection that bypasses SSH entirely — you log in as root using the password from the provider, edit /etc/ssh/sshd_config to re-enable PasswordAuthentication, restart sshd, fix your key, and try again. This is the safety net the step-by-step relies on.
Related guides
- Harden an Ubuntu VPS — broader hardening checklist; SSH keys are the first step in it.
- Change the SSH port on Linux — moves brute-force noise off port 22 (and onto port 2222 with the same SSH config you just wrote).
- Let’s Encrypt with Certbot on Ubuntu — once SSH is locked down, this is usually the next thing to set up on a new VPS.
- Install Redis on Ubuntu — for the application stack you’re protecting.
For the full OpenSSH server configuration reference, the OpenBSD sshd_config manpage is canonical — every option, every default, every behaviour explained at source.