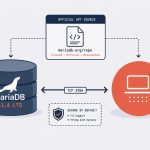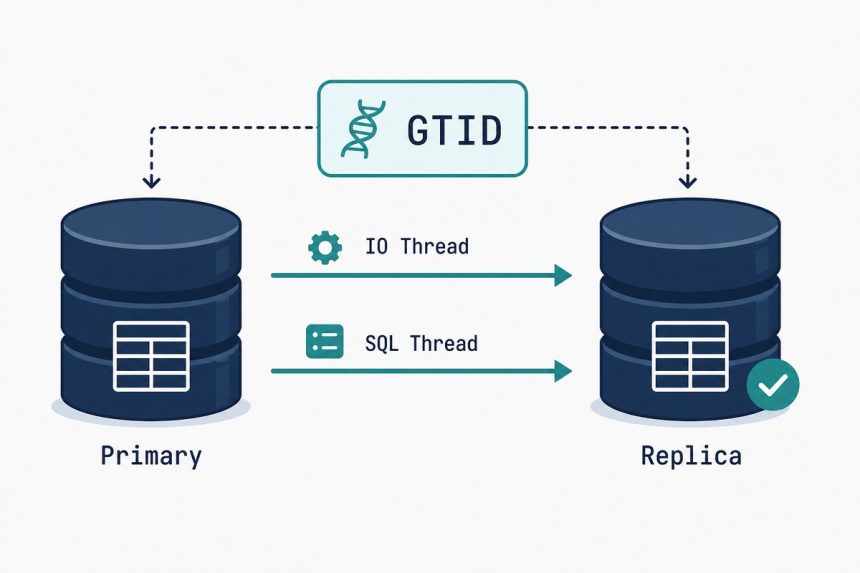
MySQL primary-replica replication moves you from a single point of failure to a hot standby with current data — same database, second server, applied in near real-time. Here’s the production-grade GTID-based setup on Ubuntu 24.04 (works the same on 22.04 and 26.04), the modern way that’s existed since MySQL 8.0 (replacing the old log-file-position approach). Two VPS, one replication user, one snapshot transfer, and a verification step that catches the most common silent failure.
- TL;DR
- Why replicate (and what you get)
- Prerequisites
- Step 1 — Configure the primary
- Step 2 — Create the replication user
- Step 3 — Snapshot the primary’s data
- Step 4 — Configure the replica
- Step 5 — Point the replica at the primary and start
- Step 6 — Verify replication is working
- Troubleshooting
- "Replica_IO_Running: No"
- "Seconds_Behind_Source keeps growing"
- "Replication broke mid-flight with a duplicate-key error"
- Related guides
TL;DR
Two servers running MySQL 8.0+ on Ubuntu. Primary: enable binary logging + GTID, create a replication user, dump the data with --source-data. Replica: load the dump, point at the primary with CHANGE REPLICATION SOURCE TO …, START REPLICA, and watch SHOW REPLICA STATUS until Seconds_Behind_Source stabilises near zero. The hard parts are network config (replica needs port 3306 access to primary) and the order of operations during the dump.
Why replicate (and what you get)
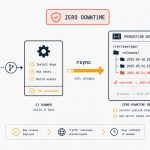
- Hot standby for failover. If the primary dies, you promote the replica and your application keeps running. Recovery time becomes minutes instead of hours-to-restore-from-backup.
- Read scaling. Point read-only queries at the replica, write queries at the primary. Doubles read throughput on most web workloads.
- Backup without locking. Run
mysqldumpagainst the replica without affecting the primary. You can also stop replication on the replica briefly, take a filesystem-level snapshot, and resume — true zero-impact backups. - Geographic distribution. Replicas in other regions reduce latency for read-heavy apps with global users.
Prerequisites
- Two Ubuntu servers with MySQL 8.0+ installed (matching minor versions; mixing 8.0 and 8.4 works but isn’t recommended).
- Network connectivity from the replica to the primary on port 3306 (open in the firewall, restricted to the replica’s IP).
- Root SQL access on the primary, root SQL access on the replica.
- About 30 minutes plus however long it takes to transfer a snapshot of the primary’s data.
Step 1 — Configure the primary
Edit /etc/mysql/mysql.conf.d/mysqld.cnf on the primary server:
[mysqld]
server-id              = 1
log-bin                = mysql-bin
binlog_format          = ROW
gtid_mode              = ON
enforce_gtid_consistency = ON
bind-address           = 0.0.0.0
bind-address = 0.0.0.0 opens MySQL to the network — restrict access via firewall (ufw allow from REPLICA_IP to any port 3306) so only the replica can connect. Restart:
sudo systemctl restart mysqlStep 2 — Create the replication user
On the primary’s MySQL shell:
CREATE USER 'repl'@'REPLICA_IP' IDENTIFIED WITH 'caching_sha2_password' BY 'long-random-replication-password';
GRANT REPLICATION SLAVE, REPLICATION CLIENT ON *.* TO 'repl'@'REPLICA_IP';
FLUSH PRIVILEGES;
Replace REPLICA_IP with the replica’s actual IP. The caching_sha2_password auth plugin is the MySQL 8.0+ default — using it avoids the legacy mysql_native_password warnings.
Step 3 — Snapshot the primary’s data
From the primary‘s shell (not MySQL — the OS shell):
mysqldump -u root -p \
  --all-databases \
  --single-transaction \
  --source-data=2 \
  --triggers --routines --events \
  --set-gtid-purged=ON \
  > /tmp/primary-snapshot.sql
Key flags:
--single-transaction— consistent snapshot of InnoDB tables without locking.--source-data=2— embeds a commentedCHANGE REPLICATION SOURCEline with the GTID position. The replica needs this.--set-gtid-purged=ON— writes the GTID set into the dump so the replica skips events already applied on the primary before replication started.
Transfer the dump to the replica:
scp /tmp/primary-snapshot.sql user@REPLICA_IP:/tmp/Step 4 — Configure the replica
Edit /etc/mysql/mysql.conf.d/mysqld.cnf on the replica:
[mysqld]
server-id              = 2
relay-log              = relay-log
gtid_mode              = ON
enforce_gtid_consistency = ON
read_only              = ON
super_read_only        = ON
read_only + super_read_only prevent application writes from accidentally hitting the replica and breaking replication. Restart the replica:
sudo systemctl restart mysqlLoad the snapshot:
mysql -u root -p Step 5 — Point the replica at the primary and start
In the replica's MySQL shell:
CHANGE REPLICATION SOURCE TO
  SOURCE_HOST     = 'PRIMARY_IP',
  SOURCE_PORT     = 3306,
  SOURCE_USER     = 'repl',
  SOURCE_PASSWORD = 'long-random-replication-password',
  SOURCE_AUTO_POSITION = 1;

START REPLICA;
SOURCE_AUTO_POSITION = 1 tells the replica to use GTID for tracking position — no need to specify a binlog file or position manually.
Step 6 — Verify replication is working
SHOW REPLICA STATUS\GLook for these three values:
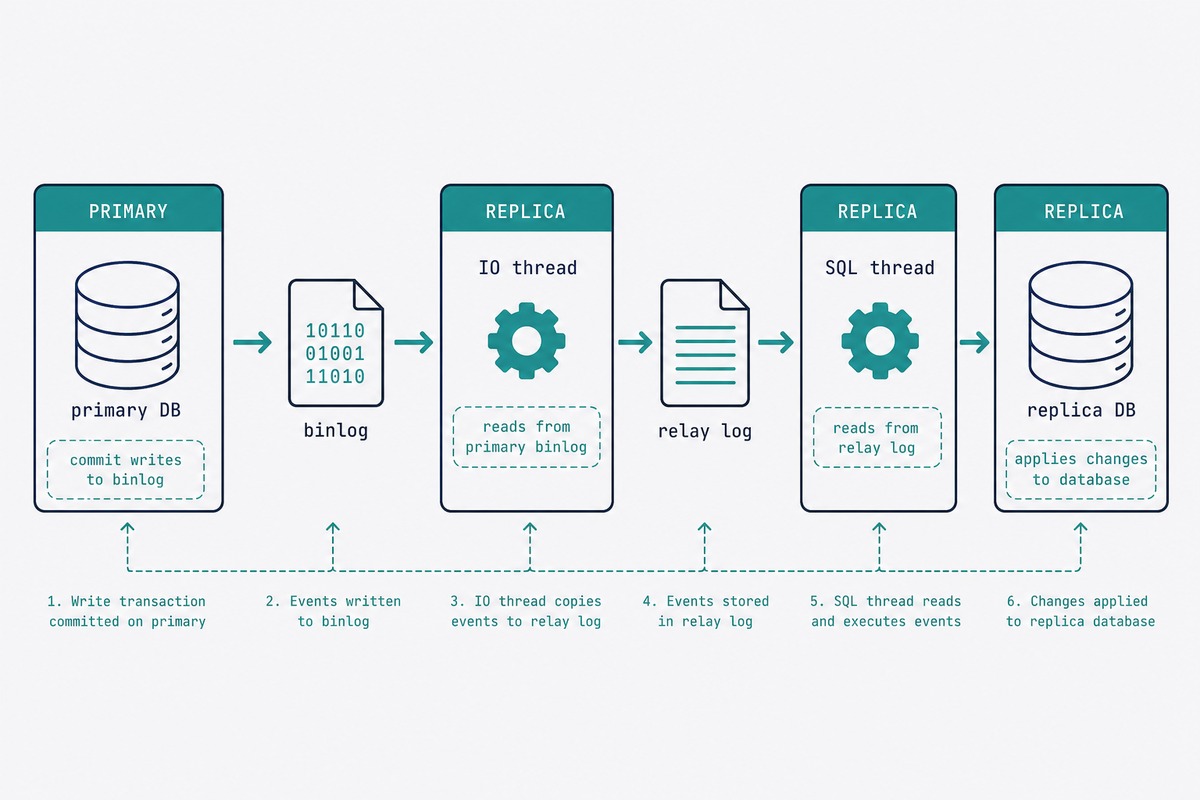
- Replica_IO_Running: Yes — replica is reading binlog from primary
- Replica_SQL_Running: Yes — replica is applying events to its own data
- Seconds_Behind_Source: 0 (or a small number that's not growing)
Test it: create a table on the primary, watch it appear on the replica within a second:
-- on primary
CREATE DATABASE repl_test;
USE repl_test;
CREATE TABLE ping (id INT);
INSERT INTO ping VALUES (1);

-- on replica
USE repl_test;
SELECT * FROM ping;
-- expect: id=1
Troubleshooting
"Replica_IO_Running: No"
Network or credential issue. Check Last_IO_Error in SHOW REPLICA STATUS: it's usually "Access denied" (wrong password or user not granted from replica's IP) or "Can't connect to MySQL server" (firewall blocking 3306, or bind-address not changed). Fix and run STOP REPLICA; START REPLICA;.
"Seconds_Behind_Source keeps growing"
Replica can't keep up with the primary's write rate. Causes: replica has slower disk (single-thread SQL apply is I/O-bound), replica is under-provisioned RAM (buffer pool too small), or a long-running query is blocking SQL thread. Use SHOW PROCESSLIST on the replica to identify the bottleneck. For sustained write-heavy workloads, enable parallel replication: SET GLOBAL replica_parallel_workers = 4;.
"Replication broke mid-flight with a duplicate-key error"
Means something wrote to the replica directly, bypassing replication. read_only doesn't apply to root (you need super_read_only). The fix depends on damage scope — usually delete the conflicting row on the replica and START REPLICA;. For widespread divergence, re-snapshot from the primary.
Both, for different reasons. Backups protect against logical corruption (bad query, dropped table, ransomware) — replication doesn't, because replicas faithfully replicate the destructive change. Replication protects against hardware failure and gives you read scaling and fast failover. The right answer for production is daily logical backups (mariadb-dump or mysqldump) plus a replica for failover.
Yes, but the transition has to be deliberate. To convert a non-GTID setup to GTID, both servers need gtid_mode = ON and enforce_gtid_consistency = ON, applied in stages. For brand-new replication setups, start with GTID — it's the modern default and makes failover much simpler.
Writes fail on the primary, replication catches up to the last applied event, and stops there. When you free space, the primary resumes and the replica catches up. The binlog itself fills disk over time — set binlog_expire_logs_seconds = 604800 (7 days) or use PURGE BINARY LOGS BEFORE NOW() - INTERVAL 7 DAY; on a cron job.
You can but you shouldn't. read_only = ON blocks regular users; super_read_only = ON also blocks root. The only acceptable writes on a replica are administrative ones (creating new replication users for further fan-out replicas, for example). Application writes belong on the primary.
On the replica: STOP REPLICA; RESET REPLICA ALL; to disconnect from the dead primary. Set read_only = OFF; super_read_only = OFF; to allow writes. Point your application's database connection at the new primary's address. When you rebuild the old primary, configure it as a replica of the new one to rebuild redundancy.
On the primary: roughly 5-10% CPU during high write loads (cost of writing the binary log). On the replica: similar to a normal MySQL server. Bandwidth: the binlog stream is proportional to write rate — a server doing 100 writes/sec with small rows generates maybe 1-2 MB/sec of binlog traffic.
Related guides
- Install MySQL on Ubuntu — needed on both servers before this guide applies.
- Install MariaDB on Ubuntu — the same replication concept works with MariaDB; the commands are identical.
- Disable MySQL binary logging — for the standalone server case, opposite of what this guide does.
- MySQL binary log cleanup — manage the disk usage that replication's binlogs create.
The full replication reference, including parallel-replica tuning and group-replication, lives in the MySQL Reference Manual replication chapter.