To run a cron job as a non-root user, edit that user’s own crontab — every job in a per-user crontab runs as the user who owns it, no sudo needed. The recipe is sudo crontab -u username -e (as root) or crontab -e (logged in as the user).
Last verified: 2026-05-17 on Ubuntu 22.04 and AlmaLinux 9. Originally published 2023-08-17, rewritten and updated 2026-05-17.
Method 1 — log in as the user
# SSH in as the target user, or
sudo -i -u username

# Then edit their crontab
crontab -e
Anything you add runs as that user automatically. The crontab file lives at /var/spool/cron/username (RHEL-family) or /var/spool/cron/crontabs/username (Debian-family).
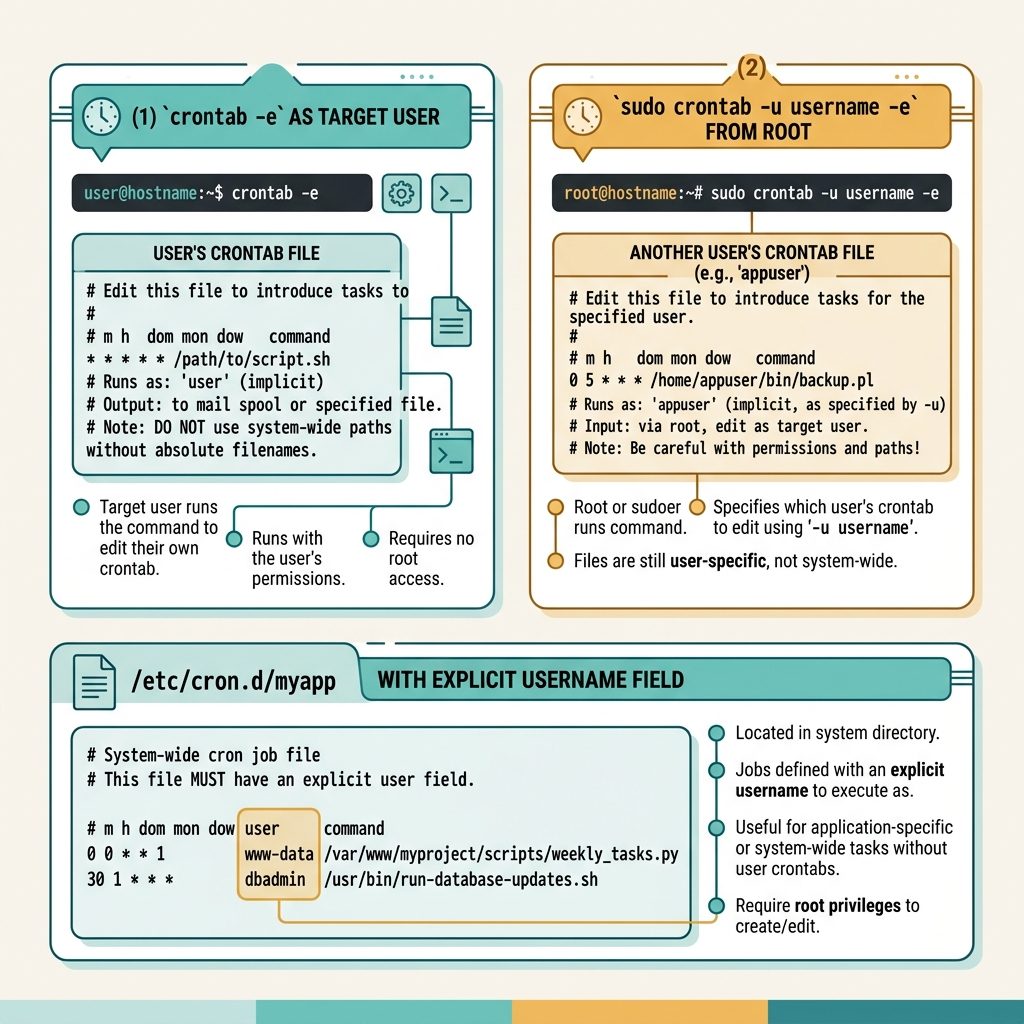
Method 2 — root edits another user’s crontab
sudo crontab -u www-data -e-u username tells crontab which user’s file to edit. Useful for system service accounts that don’t have an interactive shell (www-data, nobody, postgres).
Method 3 — system crontab in /etc/cron.d/
sudo tee /etc/cron.d/myapp <<'CRON'
PATH=/usr/local/bin:/usr/bin:/bin

* * * * * www-data /usr/bin/php /var/www/html/app/bin/legacy -C cron >> /var/log/myapp.log 2>&1
CRON
Files in /etc/cron.d/ follow the system-crontab format with a username field between the schedule and the command. Good fit for application-deployed cron jobs because the file lives with your app’s config, not buried in /var/spool/.
Don’t put sudo in the crontab line
You’ll occasionally see * * * * * sudo username command suggestions — skip those. sudo from a non-interactive cron job either prompts for a password (which can’t be entered) or requires a NOPASSWD sudoers entry. Both add friction for no benefit when the per-user crontab or /etc/cron.d/ already runs jobs as the desired user.
Set the environment explicitly
# Inside crontab -e
SHELL=/bin/bash
PATH=/usr/local/bin:/usr/bin:/bin
HOME=/home/myuser

* * * * * php /var/www/html/app/bin/legacy -C cron >> /var/log/myapp.log 2>&1
Cron’s environment is minimal — set PATH, HOME, and anything your job depends on at the top. Variables defined here apply to every job in the file below.
Verify it ran
# cron's own log
sudo grep CRON /var/log/syslog        # Ubuntu/Debian
sudo grep CROND /var/log/cron         # RHEL/Alma/Rocky

# List the user's crontab
sudo crontab -u username -l
Frequently asked questions
Per-user crontabs live under /var/spool/cron/ (CentOS/RHEL) or /var/spool/cron/crontabs/ (Debian/Ubuntu) — one file per user, named after the username. Edit them only via crontab -e, never by hand: the file is parsed and reloaded automatically when you save through the command, and direct edits can be lost.
/etc/crontab and crontab -e? /etc/crontab is the system crontab — root-owned, every line has a username field. crontab -e edits a per-user crontab where every job runs as that user automatically — no username field, no sudo. For one-off user-specific jobs, prefer the per-user crontab; reserve /etc/crontab and /etc/cron.d/ for system-wide tasks that need explicit user assignments.
php or node? Cron runs with a minimal PATH (/usr/bin:/bin on most systems) and a near-empty environment. If your binary lives in /usr/local/bin or ~/.local/bin, give the full absolute path or set PATH= at the top of the crontab. Same for NODE_ENV, LANG, etc. — set them explicitly in the crontab, don’t rely on your login shell’s profile.
Replace >/dev/null 2>&1 with a real log file: * * * * * php /path/script.php >> /var/log/myapp.log 2>&1. >> appends so you keep history; 2>&1 sends stderr into the same file. Rotate it with logrotate to keep the file from growing forever.
Related guides
- How to Stop Cron Job Output
- How to Set Up a System-Based Cron Job for WordPress
- How to Check the Linux OS Name and Version from the Command Line
References
man 5 crontab, man 1 crontab on any Linux. systemd timers (modern alternative): freedesktop.org/software/systemd/man/systemd.timer.html.