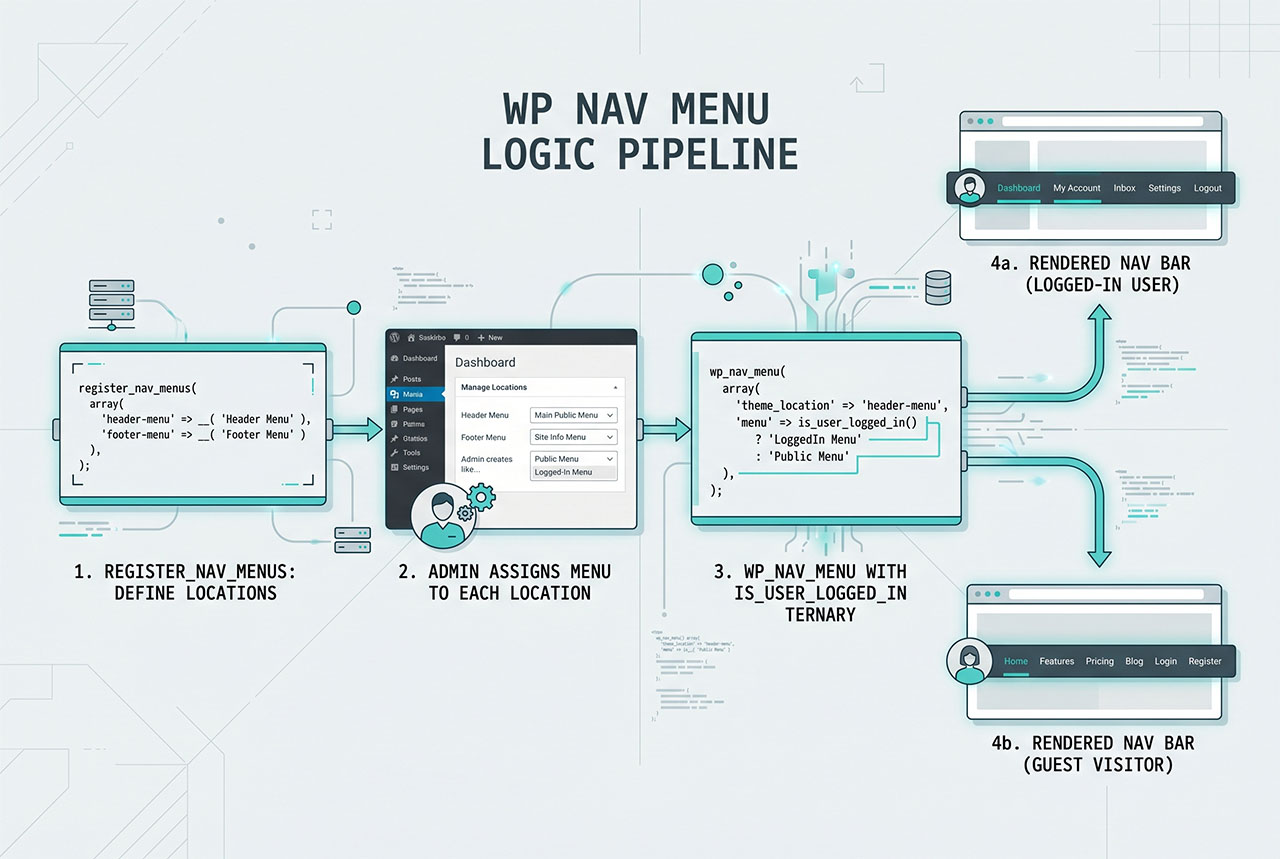
A wordpress logged in menu swap is two pieces of code: register_nav_menus declares two locations in functions.php, and wp_nav_menu in the template picks which one to render based on is_user_logged_in(). No plugin, no filter gymnastics — just a ternary on the theme_location arg. This guide covers the full setup, a lighter filter-based alternative for small item-level differences, and how to test the switch without juggling two accounts.
Last verified: 2026-04-23 on WordPress 6.5 and PHP 8.3. Originally published 2022-06-16, rewritten and updated 2026-04-23.
TL;DR
// functions.php
add_action( 'after_setup_theme', 'how7o_register_nav_menus' );
function how7o_register_nav_menus() {
register_nav_menus( array(
'logged-in-menu' => 'Logged In Menu',
'logged-out-menu' => 'Logged Out Menu',
) );
}
// header.php (or wherever the nav goes)
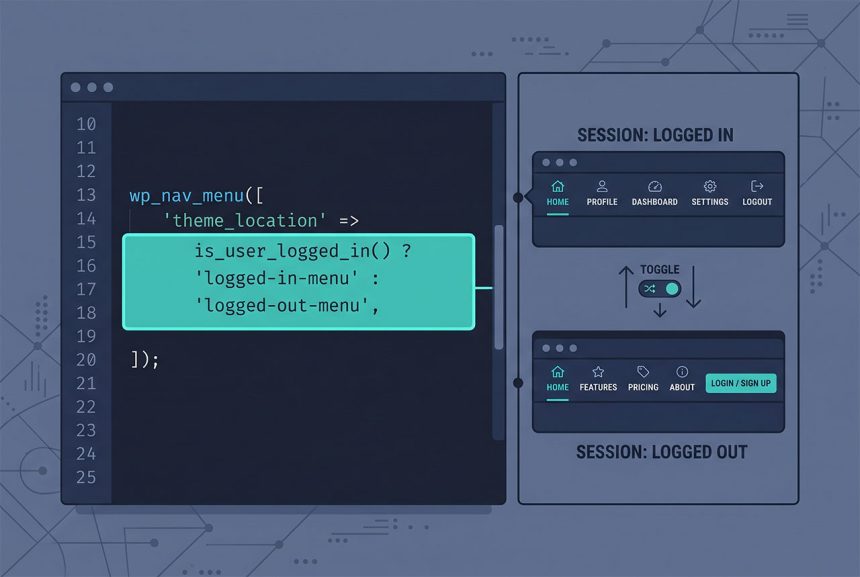
wp_nav_menu( array(
'theme_location' => is_user_logged_in() ? 'logged-in-menu' : 'logged-out-menu',
) );Step 1 — Register two menu locations
add_action( 'after_setup_theme', 'how7o_register_nav_menus' );

function how7o_register_nav_menus() {
    register_nav_menus( array(
        'logged-in-menu'  => 'Logged In Menu',
        'logged-out-menu' => 'Logged Out Menu',
    ) );
}
The array keys (logged-in-menu, logged-out-menu) are internal slugs you’ll reference in wp_nav_menu. The values are the human-readable labels WordPress shows in Appearance → Menus. Registering happens on after_setup_theme so it runs after the theme has booted but before the admin UI renders.
After adding this code, go to Appearance → Menus, build two menus (or edit existing ones), and assign one to each of the new locations.
Step 2 — Swap in the template
wp_nav_menu( array(
    'theme_location' => is_user_logged_in() ? 'logged-in-menu' : 'logged-out-menu',
    'container'      => 'nav',
    'container_class' => 'site-nav',
) );
is_user_logged_in() returns the boolean; the ternary picks the location. Everything else in the wp_nav_menu args is shared between the two states — same wrapper, same classes, same markup — just a different menu assigned to the selected location.
See How to Check If a User Is Logged In in WordPress for the broader context around the conditional.
Alternative — one menu, filter items per state
If the logged-in and logged-out menus differ by only a couple of items — the logged-in user sees “My Account” and “Log Out”, the guest sees “Sign up” — it’s cleaner to keep one menu and filter items on render:
add_filter( 'wp_nav_menu_objects', 'how7o_filter_nav_by_login', 10, 2 );

function how7o_filter_nav_by_login( $items, $args ) {
    // Scope to a specific menu location so the filter doesn't affect other menus
    if ( empty( $args->theme_location ) || $args->theme_location !== 'primary' ) {
        return $items;
    }

    $logged_in = is_user_logged_in();

    return array_filter( $items, function ( $item ) use ( $logged_in ) {
        if ( in_array( 'logged-in-only', $item->classes, true ) ) {
            return $logged_in;
        }
        if ( in_array( 'logged-out-only', $item->classes, true ) ) {
            return ! $logged_in;
        }
        return true;
    } );
}
Give menu items a CSS class of logged-in-only or logged-out-only in Appearance → Menus (expand the item panel → “CSS Classes” field, enable via Screen Options if missing). The filter then drops the items that don’t match the current state. Good for 1–2 item differences; clumsier than the two-menu approach when the whole nav changes.
Always include a login/logout link
For the universal “login when logged out, logout when logged in” tail item, WordPress provides helpers so you don’t have to hardcode URLs:
if ( is_user_logged_in() ) {
    echo '<a href="' . esc_url( wp_logout_url( home_url( '/' ) ) ) . '">Log out</a>';
} else {
    echo '<a href="' . esc_url( wp_login_url( get_permalink() ) ) . '">Log in</a>';
}
wp_logout_url( $redirect_to ) includes the nonce; wp_login_url( $redirect_to ) includes the return-to query parameter so the user lands back on the current page after logging in.
Frequently asked questions
Register two nav menu locations via register_nav_menus in functions.php, then call wp_nav_menu with a ternary on is_user_logged_in() to pick the location. One template tag, one conditional, no plugin needed.
Yes — nav menu locations are a theme construct that the admin uses to assign a Menu (a collection of items) to a spot in the theme. You register the locations in code; the admin builds the menus in Appearance → Menus and picks which menu goes where. The code never cares about the menu items themselves.
Yes, with the wp_nav_menu_objects filter: iterate the items, keep or drop each by URL, class, or meta. That’s better for small adjustments (show an extra “Account” link for logged-in users); the two-menu approach is cleaner when the logged-in and logged-out menus differ significantly. Rule of thumb: 1–2 item differences → filter. Whole-nav swap → two menus.
Block themes use the Navigation block, not wp_nav_menu(). To swap navs in a block theme, register block patterns for the two variants and use a Navigation block with conditional visibility — or render classic nav menus from a template part via wp_nav_menu() called inside a PHP file referenced from theme.json. Classic themes (the shape most of the web is on) still use the template-tag pattern here.
WordPress ships an incognito login dance: edit the post in one browser profile, open a private/incognito window, visit the site. Private mode has no cookies, so you see the guest menu; your logged-in profile sees the authenticated menu. Quicker than creating a second user.
Related guides
- How to Check If a User Is Logged In in WordPress — the conditional at the heart of this swap.
- How to Login a User Programmatically in WordPress — the auth side.
- How to Search Users in WordPress — when the logged-in menu needs to link to user-management pages.
- How to Change a User Profile Picture in WordPress Without a Plugin — other theme-level user customizations.
References
WordPress developer reference for register_nav_menus and wp_nav_menu: developer.wordpress.org/reference/functions/register_nav_menus.