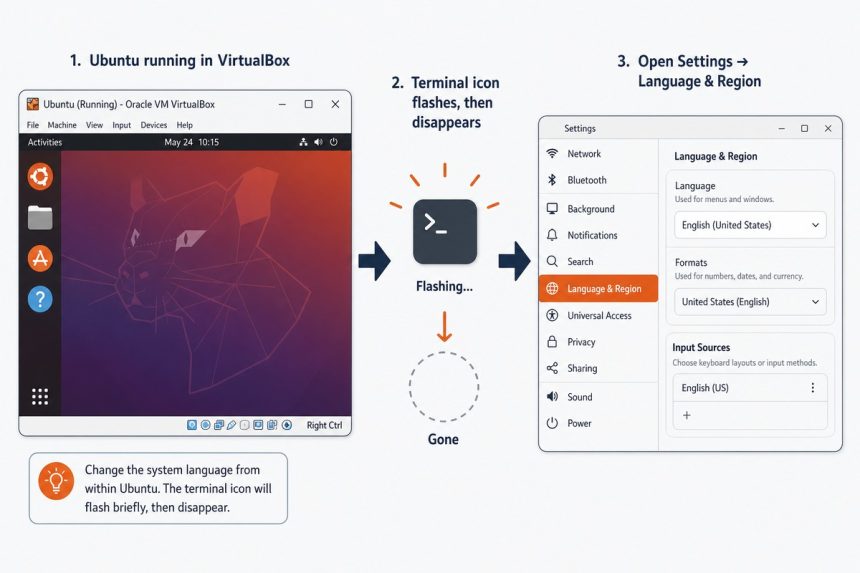
If the terminal won’t open on Ubuntu 22.04+ running inside VirtualBox — the launcher name flashes in the top-left and then disappears with no terminal window — the cause is a malformed locale, usually from VirtualBox 7’s unattended installer. The quickest fix is to change the system language to a different locale and back, which regenerates the locale files.
Last verified: 2026-05-17 on Ubuntu 24.04 in VirtualBox 7.1. Originally published 2023-03-02, rewritten and updated 2026-05-17.
Fix via the GUI
- Open the Settings app in Ubuntu.
- Sidebar → Region & Language (older releases: Language & Region).
- Click the Language button and pick a different language — e.g. British English instead of American English.
- Apply, then change it back to your preferred language. Apply again.
- Reboot the VM.
- Open the terminal — it should launch normally now.
Toggling the language regenerates the locale files that were left incomplete during the install. Once they exist, the terminal launcher can resolve LANG and start cleanly.
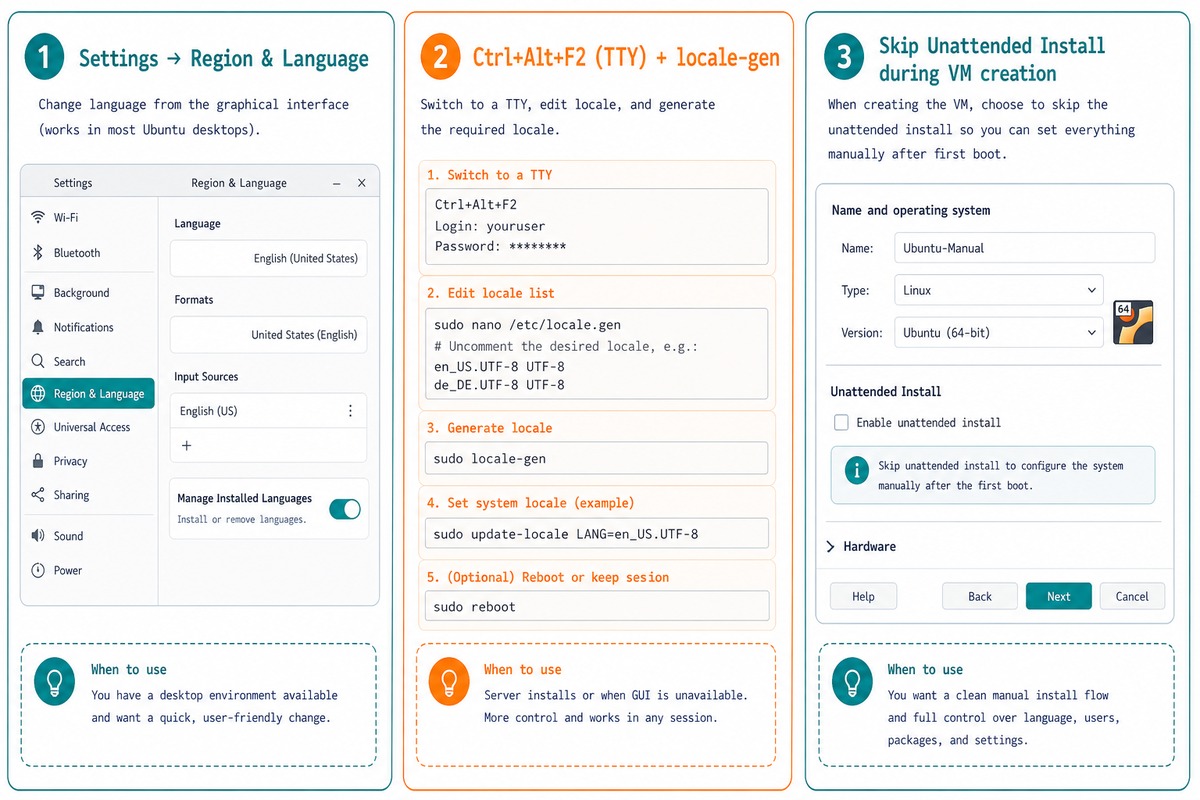
Fix from a TTY (if no terminal works at all)
# Switch to a TTY: Ctrl+Alt+F2 (or F3/F4). Log in.
sudo locale-gen en_US.UTF-8
sudo update-locale LANG=en_US.UTF-8

# Back to the desktop with Ctrl+Alt+F1 (or F7), then reboot
sudo reboot
Pure-CLI alternative — useful when the GUI terminal launcher refuses to open and you can’t get to Settings from the desktop. The TTY (text-only console) is always available.
Prevent it during install — skip unattended mode
If you’re installing a fresh VM, untick Skip Unattended Installation‘s opposite — that is, check “Skip Unattended Installation” — in VirtualBox’s new-VM dialog. You’ll click through the regular Ubuntu installer instead of letting VirtualBox auto-fill the answers. Slightly more clicks, but the locale comes out correctly configured and you avoid the terminal-launcher bug entirely.
Confirm the fix
locale
# Should print en_US.UTF-8 (or whatever you set) on every LANG_* line,
# with no warnings about "Cannot set LC_ALL to default locale"

echo $LANG
# en_US.UTF-8
Frequently asked questions
The terminal launcher reads the locale from LANG / LC_ALL. On fresh Ubuntu installs (especially via VirtualBox’s “unattended” auto-installer), the locale can land in a half-configured state — en_US.UTF-8 is declared but the locale files weren’t generated. The terminal application errors out silently on launch when it can’t find the locale. Selecting a different language and applying it regenerates the locale files, fixing the launch.
Yes — regenerate it from the terminal you can reach (e.g. Ctrl+Alt+F2 for a TTY): sudo locale-gen en_US.UTF-8 then sudo update-locale LANG=en_US.UTF-8, then reboot. Same effect as the GUI Language & Region toggle, faster if you’re comfortable with a TTY.
VirtualBox 7’s unattended installer answers Ubuntu’s setup wizard automatically but uses a minimal locale config that triggers the bug. Skipping unattended mode lets you walk through the regular installer, which configures the locale fully. Trade-off: you have to click through the install dialog manually.
Rarely — the bug is mostly tied to VirtualBox 7’s unattended installer. Bare-metal Ubuntu installs (or other VM hypervisors) usually configure the locale correctly. If you do hit it elsewhere, the locale-gen fix is the same.
Related guides
- How to Check Your Ubuntu Version
- How to Check the Linux OS Name and Version from the Command Line
- How to List Network Devices on Linux
References
Ubuntu Locale documentation: help.ubuntu.com/community/Locale. VirtualBox documentation: virtualbox.org/manual.